Complete Guide To

Complete Guide To

Mobile apps are both a blessing and a curse for marketers. On the one hand, mobile apps are a fertile frontier, offering novel engagement, branding, and advertising opportunities. On the other hand, the nature of the update cycle makes mobile apps relatively stagnant compared to websites. On your site, you can update your content, deploy tags, and add features almost instantaneously.
By comparison, mobile apps are basically static upon installation. You have to wait to make even minute changes to the app until your update arrives in app stores. When it does, you still can’t count on users to update promptly, if ever. Compared to instant gratification of website updates, changing mobile apps is like watching grass grow!

Or at least it was before 2013, when Google Tag Manager for Mobile Apps was born. GTM for Mobile requires you to instrument your mobile app once; after that, you can modify configurations and add tags without ever putting out an app update. In this chapter we’ll further discuss the advantages of GTM for Mobile Apps and explain how to implement GTM for mobile devices.
As we mentioned earlier, the fact that apps take forever to change hurts the accuracy of your data collection as well as the timeliness and efficacy of your campaigns. The lag between making changes to your app and actually seeing those changes implemented is unacceptable. Imagine ordering yourself a new wardrobe brimming with this season’s hottest trends. The shipping takes 10 months. By then, the fashion winds have shifted, and Kim-and-Kanye-caliber leather jogging pants are all the rage. Standing next to your box of above-the-ankle skinny jeans, you look and feel obsolete.

This trend tragedy captures the plight of marketers and developers in trying to keep mobile apps relevant. The deployment delay is so long that the changes are effectively moot by the time updates make their way to users’ phones, just like a box of jeggings in a leather jogging pant world. Once you ship an app, your hands are basically tied.
Say you forgot to add a Google Analytics event to a critical form submission … too bad. Or maybe you forgot to change a key configuration setting … oh, well. Perhaps you created a brilliant new campaign on the fly and need to include conversion tracking for it … that’s a shame, because it’s not happening.
GTM changes all that. Publishing an app with GTM for mobile allows you to continually update configurations and add analytics and other tracking later without having to update your app. As we’ll explain below, all you have to do is create a container and publish new versions of your changes through GTM for Mobile. In this way, GTM can offer support across all your users’ devices, from mobile websites to native mobile apps.

Just like GTM proper, GTM for Mobile has a free, user-friendly, Web-based interface. GTM for Mobile supports Google Analytics for Mobile Apps and AdWords Conversion Tracking and Remarketing tags. You can also use third-party tracking tools with the custom tag option. Last but not least, you can perform content experiments for mobile apps with GTM to see which iteration has the biggest impact on your numbers.
Those of you who have been with us throughout the guide will find implementing GTM for Mobile a cake walk because it’s really no different from the standard GTM. In implementing Mobile, we’ll deal with the same macros (variables), rules (triggers), and tag templates you’ve come to know and love. We’ll just add a novel container type: the Mobile App Container. Below, we’ll walk you through the GTM for Mobile implementation process.
1. Create a Mobile App Analytics Account. If you don’t have a Google Analytics account, it’s time to get one. Go to the Google Analytics sign-up page and create an account or sign in if you have one. Now create a new property in the account, and be sure to select the “mobile app” option. Once you have a mobile app property, go to the “Admin” page and click “Property Settings” in the “Property” column to find your app’s tracking ID number.
2. Create a GTM Account. If you don’t have a GTM account, create one. Go to Google Tag Manager and create a new account named after your mobile app. If you already have a GTM account, don’t create another one for your app. You can manage multiple properties (e.g., a website and a mobile app) with a single GTM account.
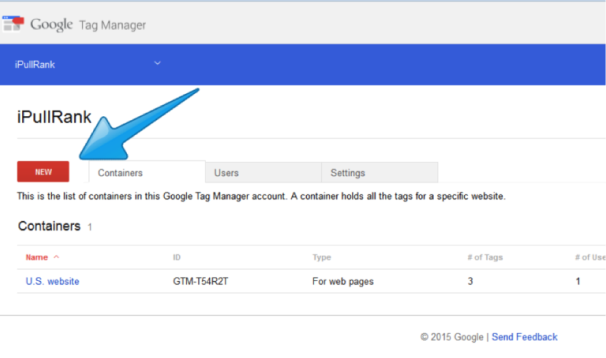
3.Create a container. You’ll create a container for every mobile app you have. Every time you release a major new version of the app, you should create a new container. Put the app’s name and version number in the container’s name, such as “Dogparklocatorapp2_1.” To create a new container in GTM V1, click on “Accounts” or the name of your applicable account if you have just one. Click the red “New” button on that screen as shown below.
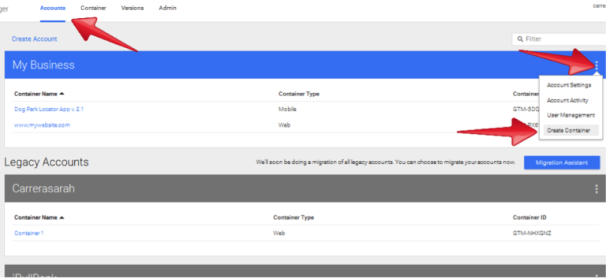
In GTM V2, click on the “Accounts” tab at the top left of the page, and then click the three small dots to the right of the associated account to see “Create Container” from the drop-down menu. Designate whether your mobile app is iOS or Android. Click “Create” after you’ve named the container.
4. Configure Your App from the Container. You will use a “Value Collection Variable” (fancy GTM V2 name for a macro) to define your app’s configuration values. Your mobile app container will automatically have predefined variables – such as screen resolution, operating system version, and app name – that you can plug in to triggers (rules). That way, your configuration values can adapt to various conditions.
5. Implement GTM for Mobile Apps SDK. All those acronyms mean is that this step will allow your app to talk to the container you just created in GTM. You’ll need to download the Mobile Apps Software Development Kit (SDK) for both iOS and Android if you want your app compatible with both platforms.
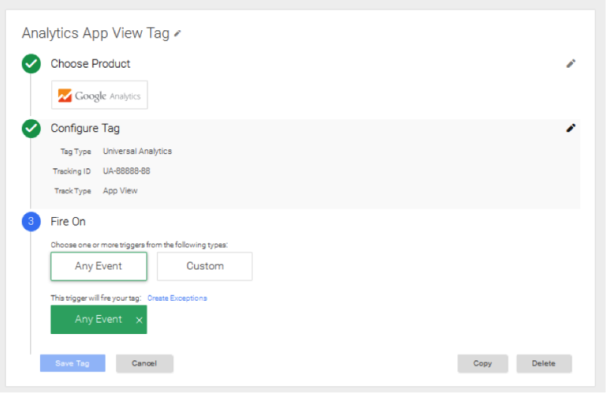
6. Create an Analytics App View Tag. Now you’ll create a tag in your mobile app container for Google Analytics. Choose “New” under the tags menu, and name the tag. Choose Universal or Classic Analytics depending on what you use and enter your tracking ID. Choose “App View” under the “Track Type” drop-down menu. Set the tag to fire on “any event,” a trigger built into GTM mobile app containers that means your tag will always fire. Click “Save Tag.”
7. Create a version, preview, debug, and publish. Create a version of your container to make sure your tag configurations function properly. Once you’re satisfied, hit “Publish.”
![]()
![]()
Mobile apps are both a blessing and a curse for marketers. On the one hand, mobile apps are a fertile frontier, offering novel engagement, branding, and advertising opportunities. On the other hand, the nature of the update cycle makes mobile apps relatively stagnant compared to websites. On your site, you can update your content, deploy tags, and add features almost instantaneously.
By comparison, mobile apps are basically static upon installation. You have to wait to make even minute changes to the app until your update arrives in app stores. When it does, you still can’t count on users to update promptly, if ever. Compared to instant gratification of website updates, changing mobile apps is like watching grass grow!
Or at least it was before 2013, when Google Tag Manager for Mobile Apps was born. GTM for Mobile requires you to instrument your mobile app once; after that, you can modify configurations and add tags without ever putting out an app update. In this chapter we’ll further discuss the advantages of GTM for Mobile Apps and explain how to implement GTM for mobile devices.
As we mentioned earlier, the fact that apps take forever to change hurts the accuracy of your data collection as well as the timeliness and efficacy of your campaigns. The lag between making changes to your app and actually seeing those changes implemented is unacceptable. Imagine ordering yourself a new wardrobe brimming with this season’s hottest trends. The shipping takes 10 months. By then, the fashion winds have shifted, and Kim-and-Kanye-caliber leather jogging pants are all the rage. Standing next to your box of above-the-ankle skinny jeans, you look and feel obsolete.
This trend tragedy captures the plight of marketers and developers in trying to keep mobile apps relevant. The deployment delay is so long that the changes are effectively moot by the time updates make their way to users’ phones, just like a box of jeggings in a leather jogging pant world. Once you ship an app, your hands are basically tied.
Say you forgot to add a Google Analytics event to a critical form submission … too bad. Or maybe you forgot to change a key configuration setting … oh, well. Perhaps you created a brilliant new campaign on the fly and need to include conversion tracking for it … that’s a shame, because it’s not happening.
GTM changes all that. Publishing an app with GTM for mobile allows you to continually update configurations and add analytics and other tracking later without having to update your app. As we’ll explain below, all you have to do is create a container and publish new versions of your changes through GTM for Mobile. In this way, GTM can offer support across all your users’ devices, from mobile websites to native mobile apps.
Just like GTM proper, GTM for Mobile has a free, user-friendly, Web-based interface. GTM for Mobile supports Google Analytics for Mobile Apps and AdWords Conversion Tracking and Remarketing tags. You can also use third-party tracking tools with the custom tag option. Last but not least, you can perform content experiments for mobile apps with GTM to see which iteration has the biggest impact on your numbers.
Those of you who have been with us throughout the guide will find implementing GTM for Mobile a cake walk because it’s really no different from the standard GTM. In implementing Mobile, we’ll deal with the same macros (variables), rules (triggers), and tag templates you’ve come to know and love. We’ll just add a novel container type: the Mobile App Container. Below, we’ll walk you through the GTM for Mobile implementation process.
1. Create a Mobile App Analytics Account. If you don’t have a Google Analytics account, it’s time to get one. Go to the Google Analytics sign-up page and create an account or sign in if you have one. Now create a new property in the account, and be sure to select the “mobile app” option. Once you have a mobile app property, go to the “Admin” page and click “Property Settings” in the “Property” column to find your app’s tracking ID number.
2. Create a GTM Account. If you don’t have a GTM account, create one. Go to Google Tag Manager and create a new account named after your mobile app. If you already have a GTM account, don’t create another one for your app. You can manage multiple properties (e.g., a website and a mobile app) with a single GTM account.
3.Create a container. You’ll create a container for every mobile app you have. Every time you release a major new version of the app, you should create a new container. Put the app’s name and version number in the container’s name, such as “Dogparklocatorapp2_1.” To create a new container in GTM V1, click on “Accounts” or the name of your applicable account if you have just one. Click the red “New” button on that screen as shown below.
In GTM V2, click on the “Accounts” tab at the top left of the page, and then click the three small dots to the right of the associated account to see “Create Container” from the drop-down menu. Designate whether your mobile app is iOS or Android. Click “Create” after you’ve named the container.
4. Configure Your App from the Container. You will use a “Value Collection Variable” (fancy GTM V2 name for a macro) to define your app’s configuration values. Your mobile app container will automatically have predefined variables – such as screen resolution, operating system version, and app name – that you can plug in to triggers (rules). That way, your configuration values can adapt to various conditions.
5. Implement GTM for Mobile Apps SDK. All those acronyms mean is that this step will allow your app to talk to the container you just created in GTM. You’ll need to download the Mobile Apps Software Development Kit (SDK) for both iOS and Android if you want your app compatible with both platforms.
6. Create an Analytics App View Tag. Now you’ll create a tag in your mobile app container for Google Analytics. Choose “New” under the tags menu, and name the tag. Choose Universal or Classic Analytics depending on what you use and enter your tracking ID. Choose “App View” under the “Track Type” drop-down menu. Set the tag to fire on “any event,” a trigger built into GTM mobile app containers that means your tag will always fire. Click “Save Tag.”
7. Create a version, preview, debug, and publish. Create a version of your container to make sure your tag configurations function properly. Once you’re satisfied, hit “Publish.”
![]()
![]()