Runtime is a film created by the iPullRank team with the goal of using a narrative to educate people on some somewhat advanced technical SEO tactics. Effectively, the talk introduces over 30 technical tactics that can be leveraged in a variety of ways for scalable optimization.
Our goal is to expose more SEOs to the aspects of digital products and what can be adjusted to make SEO work better. In this film you get a sense of how we might think through solutions using application and server configurations and features to improve visibility of content.
My character says that our sites are programs that act inputs to a search engine which is another program. We’re talking about how to change our program’s output to meet our goals.
If you missed the film’s debut MozCon, you can watch the Director’s Cut below:
Everything you see Casey do in Runtime is real. Granted, the speed at which the implementations happen is sometimes Hollywood magic, but the code and techniques are all real. I wrote them and executed them myself.
The remainder of this page gives an overview of the tactics and code and that our heroine employs throughout the film in order of their appearance or discussion.
We will release the tactics one act at a time, so join our mailing list to be alerted when the next act’s tactics will be available.
Screaming Frog SEO Spider is perhaps the single most valuable and flexible SEO tool on the market. The team invented the crawler space as we know it today and has continued to improve this piece of software over the years.
In the film, Casey is running the tool in headless and list modes from the command line and exporting a series of reports with the following commands:
"C:\Program Files (x86)\Screaming Frog SEO Spider\screamingfrogseospidercli.exe" --crawl-list "chairish-urls.txt" --headless --save-crawl --output-folder "c:\code\beat-the-clown" --export-format "csv" --bulk-export "Response Codes:Redirection (3xx) Inlinks, Response Codes:Client Error (4xx) Inlinks" --export-tabs "Page Titles:Missing,Page Titles:Duplicate,Page Titles:Over X Characters,Page Titles:Multiple,Meta Description:Duplicate,Meta Description:Missing,Meta Description:Over X Characters,H1:Missing,H1:Multiple" --export-format "csv"
By design the file names are all the defaults, so her batch file renames these files so she can remember what is where in the future.
ren crawl.seospider chairish-crawl.seospider
ren client_error_(4xx)_inlinks.csv chairish-client_error_(4xx)_inlinks.csv
ren redirection_(3xx)_inlinks.csv chairish-redirection_(3xx)_inlinks.csv
ren h1_missing.csv chairish-h1_missing.csv
ren h1_multiple.csv chairish-h1_multiple.csv
ren meta_description_duplicate.csv chairish-meta_description_duplicate.csv
ren meta_description_missing.csv chairish-meta_description_missing.csv
ren meta_description_over_155_characters.csv chairish-meta_description_over_156_characters.csv
ren page_titles_duplicate.csv chairish-page_titles_duplicate.csv
ren page_titles_missing.csv chairish-page_titles_missing.csv
ren page_titles_multiple.csv chairish-page_titles_multiple.csv
ren page_titles_over_60_characters.csv chairish-page_titles_over_65_characters.csv
Learn more about Screaming Frog’s command line options.
Prerequisites:
The next step that isn’t shown on screen, but she alludes to in the dialog is to then push all this data to BigQuery so she can use it to inform her subsequent analyses and executions.
You can do this from the command line using the bq utility. Once that is installed, you can use the following commands to load it directly into BigQuery.
bq --location=LOCATION load \
--source_format=FORMAT \
PROJECT_ID:DATASET.TABLE \
PATH_TO_SOURCE \
SCHEMA
Specifically, if Casey were to load the chairish-meta_description_duplicate.csv into BigQuery from the command line she would run the following:
bq load \
--autodetect
--source_format=CSV \
racecondition.chairish.duplicate_descriptions \
c:\code\beat-the-clown\chairish-meta_description_duplicate.csv
Learn more about loading data to BigQuery from the command line.
Prerequisites:
Casey makes the decision to run and SEO split test because she’d come across a situation where two distinct page types across a large e-commerce site were exact duplicates of each other. The last time she came across this, she’d canonicalized one version of the page to the other, but saw a net loss of 15%. This is a real case study from one of the world’s biggest e-commerce sites. So she decided to A/B test to double check before deploying it.
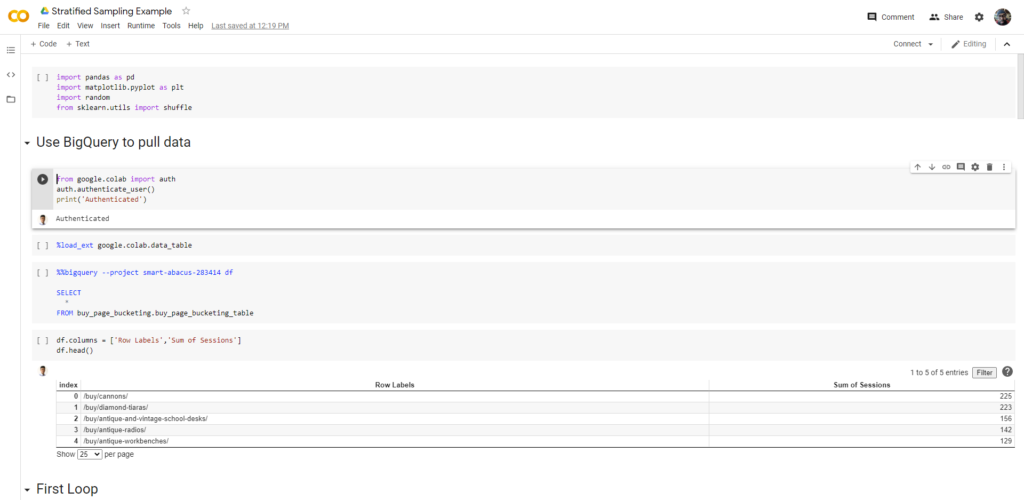
When performing SEO split testing, you need to identify a series of page buckets. Typically, mathematically minded split testers do three buckets. Two control page buckets and one variant. This supports both the A/A test for validation and the A/B test. To determine those buckets, Casey used a process called Stratified Sampling.
In the film, she did these calculations in a Jupyter Notebook. In real life, we’d do this in a Colab Notebook.
 Once you’ve got this data computed, you would pipe it back into your URL data store in BigQuery so you can make this data easily available to the website.
Learn more about Stratified Sampling for SEO Split Testing.
Prerequisites:
In the real world, you’d want to cache this data somehow rather than pulling it from a database in real-time. However, in Casey’s (ahem) case, she needed to quickly get access to the data.
So she wrote an endpoint in PHP that queried BigQuery to determine whether or not the given page was a variant.
<?php
    require_once "vendor/autoload.php";
    use Google\Cloud\BigQuery\BigQueryClient;
    if (isset($GET['url']))
    {
        $projectId = '[PROJECTID]';
        $bigQuery = new BigQueryClient([
            'projectId' => $projectId,
            'keyFilePath' => '[INSERT KEY FILE PATH HERE]',
        ]);
        $query = 'SELECT MappedUrl,Variant FROM `[INSERT datasetId.tableId HERE]` WHERE URL =' .$_GET['url'];
        $jobConfig = $bigQuery->query($query);
        $queryResults = $bigQuery->runQuery($jobConfig);
        $data = [];
        foreach ($queryResults as $row)
        {

            foreach ($row as $column => $value)
            {
                $data[] = [$column => $value];
            }
        }
        echo json_encode(['status' => 'success','message'=> count($data).' rows returned','data'=>$data]);
    }
    else{
        echo json_encode(['status' => 'error','message'=>'no URL set']);
    }
?>
We chose PHP in this case because most servers run it and it’s easy to set up with limited external libraries.
Prerequisite:
composer require google/cloud-bigqueryCasey specifically wants to test canonicalization. She writes JavaScript that requests data from her BigQuery endpoint and uses that to populate the page with a canonical tag.
  jQuery.ajax({
    type: "GET",
    url: "[URL TO BIGQUERY ENDPOINT HERE]",
    data: {url : window.location},
    success: function (data){
        for (i=0;i<data.rows.length;i++)
        {
            if (data.rows[i].Variant == 1)
            {
                var c = document.createElement("link");
                c.rel = "canonical";
                c.href = data.rows[i].MappedUrl;
                document.head.appendChild(c);
                dataLayer.push ({
                    "seoAbTestVariant": 1,
                    "relCanonical": "active"
                });
                return;
            }
               dataLayer.push({
                    "seoAbTestVariant": 1,
                    "relCanonical": "active"
                });
        }
    }
  });
You would also need both a mapping of URLs to determine where to canonicalize to.
Prerequisites
Casey went into the the first ring of the circus with a machine that didn’t have a MySQL client on it. She needed that to be able to connect to the database from the command line and make changes at scale.
She uses the following command to install the MySQL client from the command line on a Linux machine.
sudo apt-get install mysql-clientPrerequisite
Before making any changes to a database, you should copy it so it’s easy to roll it back if something goes wrong. In most cloud-based hosting environments, the service provider automatically does this for you on a database. If you’re not on a managed hosting environment, you want to make sure to make a local copy before you make any changes.
Casey does so with a single command.
mysqldump --column-statistics=0 --lock-tables=0 -u root -p -h 127.0.0.1 --all-databases > site-backup.sqlLearn more about backing up and restoring MySQL databases from the command line.
Prerequisites
Understanding that there was a site migration where there is a clear pattern in the URL structure that needs to be updated, Casey effectively did the database version of a Find and Replace.
When a migration happens, sometimes SEOs allow the 301 redirect to do the heavy lifting.
She first prepared the URL mapping in a CSV file.
Then she looped through this file in Node and performed a replace query in the column in the database that houses the core page content.
const csv = require('csv-parser');
const fs = require('fs');
var url = require('url');
const mysql = require('mysql2');
// create the connection to database
const connection = mysql.createConnection({
  host: 'localhost',
  user: 'root',
  password: 'StrongPassword'
  database: 'test'
});

fs.createReadStream('url-mapping.csv')
  .pipe(csv(['oldUrl','newUrl']))
  .on('data', (row) => {

    var oldUrl = url.parse(row.oldUrl,true);
    var newUrl = url.parse(row.newUrl,true);
    console.log (oldUrl.pathname + " > " + newUrl.pathname);
    connection.query(
      /* change this query based on table structure.
       your updating whichever column in whichever table
       is holds the html code for the page
      */
        'UPDATE bodyContent SET html = REPLACE(html, ' + oldUrl.pathname+ ', '+newUrl.pathname +')',
        function(err, results, fields) {
          console.log(results); // results contains rows returned by server
          console.log(fields); // fields contains extra meta data about results, if available
        }
  })
  .on('end', () => {
    console.log('CSV file successfully processed');
  });
Typically, this will be enough to update most of the site’s links, but there may be links handled in the page templates that would need to be updated in the code.
Learn more about find and replace on the database level in MySQL.
Prerequisites
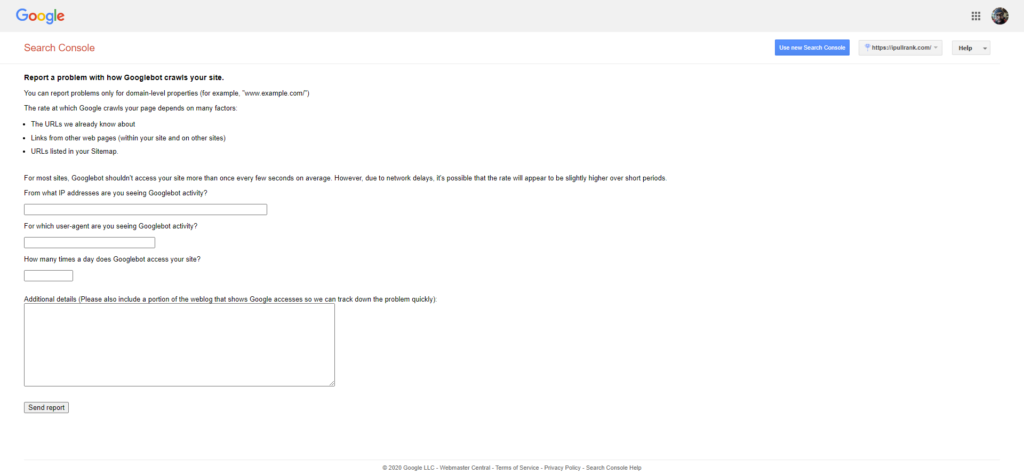
npm install mysql2npm install csv-parserBuried within Google Search Console is a section to report issues directly to the crawl team.
In our experience, if you indicate to them that there have been significant changes and you’d like your crawl rate to be temporarily increased, they will do so for 3-5 days. This can be very helpful for site migrations to mitigate traffic losses.

In the film you see Casey put n/a in the first two boxes and “not enough” in the 3rd. She then provides the details of the ask in the Additional details box.
We’ve done this multiple times for clients that have done migrations to cut down on on the expected 6 month window of losses. Your mileage may vary.
Prerequisite:
Integrated Search is a concept that gets talked about far more than it is practiced. However, there are plenty of case studies to indicate that when Organic and Paid Search are done in concert, there is a halo effect that yields higher clicks in both channels. In Act One of Runtime, Casey takes advantage of that concept by using Google Ads Scripts to manipulate bidding and keyword strategies in context of data from SerpAPI and another unnamed data source.
In real life, marketers use external data sources to trigger their ads based on when TV commercials air or the weather or any number of APIs. The extra wrinkle that Casey is introducing here is using the absolute rankings model that I’d introduced in a recent post. Effectively, her code is looking for keywords and their performance in both channels and making some decisions on when to bid or when not to.
To implement, one would first need to determine the series of business rules to optimize against, but otherwise the structure of what Casey does in the film holds.
For this one, I’m not going to share the code from the film because I don’t want to be responsible for anyone accidentally setting their bidding to spend millions of dollars. However, I will give you the components that you need to work with someone to set it up.
Before you do anything with this, I definitely encourage you to learn more about Ads Scripts.
Prerequisites
She remarks that she wishes she could also impact the site’s internal linking structure based on the decisions that her code is making. This could potentially be done if the site had a link boosting system similar to what eBay has. We talk about this further in Act Two.

Subscribe to our blog and we’ll notify you of our next post.