Complete Guide To

Complete Guide To

There’s a reason some people go into marketing and others go into IT. If we could trust the marketing folks with unfettered access to complex website code, IT would be out of a job. But certain tasks are best left to the experts, and Google Tag Manager respects that delineation. Google has anticipated the fiascos that might ensue if tech-challenged marketing types had carte blanche with website tags. GTM’s user-permission hierarchy is the product of their foresight.
In this chapter we’ll explain how to add and manage users in your GTM account. We’ll also tell you how to create account- and container-level permissions to give your users the appropriate level of control and access. Finally, to prove that we have nothing but love for our right-brained friends in marketing, we’ll discuss why it would behoove you to give marketers a certain level of access to the tag management system.
A good rule of thumb is to set up one account per company and one container per website. The account is the highest level of organization. You can create an account in seconds by visiting Google Tag Manager’s homepage and signing up. If you need to create more accounts, you can do so by clicking “Account List” and then “New Account” as shown below. To help you stay organized, name the account after your company and your containers after the websites using them.

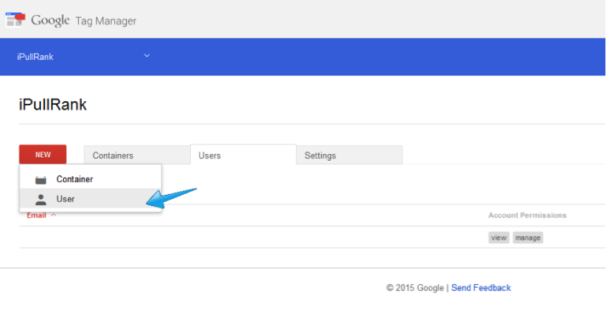
To manage the users associated with your account, go to the “All Accounts” page and select the account you want. In that screen you can view a list of the account’s users by clicking on the “Users” tab. That screen displays each user’s email address. If you want to add a user to the account, click the red “New” button, and a drop-down screen will appear. Click “User” as shown in the screenshot below.
If you want to change a user’s permissions, choose his/her name or email address from the user list. On the “Account User Settings” page, you can set up their account and container permissions with the associated drop-down menus. Make sure you hit “Save” once you’re done to preserve the changes. You can also remove a user at any time by clicking the “Delete This User” button in the bottom right-hand corner of the “Account User Settings” page.
Keep in mind that any time you add users, they will be able to view all the containers associated with your account unless you change their permissions. That’s a perfect segue into our next section …
GTM offers two levels of permissions: account and container. At the account level, a user can only have two types of permissions. The first is “View only,” which controls access based on the container permissions given to him/her for each container. For instance, if you assign User B “No access” to Container 1, User B will not even be able to see Container 1 in the account.
Alternatively, the “View, Edit, and Manage” permission level grants the user at least “View only” access to all the account’s containers. Beyond that, the container permissions you assign to the user will still dictate his/her level of access to the container. In other words, you can block a user with “View, Edit, and Manage” account permission from editing and managing containers, but not from viewing them.
You assign these permissions on a container-by-container basis. For every container you can choose among four user-access options:
> No access. The user can’t see the container listed in the account.
> View only. The user can see the container and view its tags, macros, and rules.
> View and edit. The user can add and modify a container’s tags, macros, and rules.
> View, edit, delete, and publish. The user can add, edit, and delete a container’s tags, macros, and rules and publish the modifications to the live site. The user has access to every function of GTM.
The reason behind GTM’s user-permission hierarchy is the same reason we keep children away from power tools. In the right hands, power tools can and do build marvelous things. But in inexperienced and unskilled hands they are a recipe for disaster. Publishing incorrect tags can cause you serious problems, including lost data, lost sales, and even site crashes. User permissions let you give the right people the right level of access to avert these disasters.
Think about limiting the highest level of container permissions to two people at most. Creating just one or two of these “Master Users” does two things for you. First, you have a point person who can answer for any snafus. Clear accountability motivates the Master User to make sure the tagging is done correctly. Second, if problems arise, you can easily trace them to one or two users when troubleshooting.
Recall the previous chapters where we extolled the many virtues of Google Tag Manager. We practically burst into song over the independence GTM gives marketers, who are no longer at the mercy of the webmaster’s queue. Now, all these insinuations that marketers are to tags what children are to power saws. Doesn’t limiting marketers’ access to GTM defeat its purpose of putting analytics back in the hands of the measurement experts?
Activities like deleting and publishing tags can wreak havoc on your site and your data if done improperly. For that reason, IT and IT only should have the highest-level permissions in GTM.
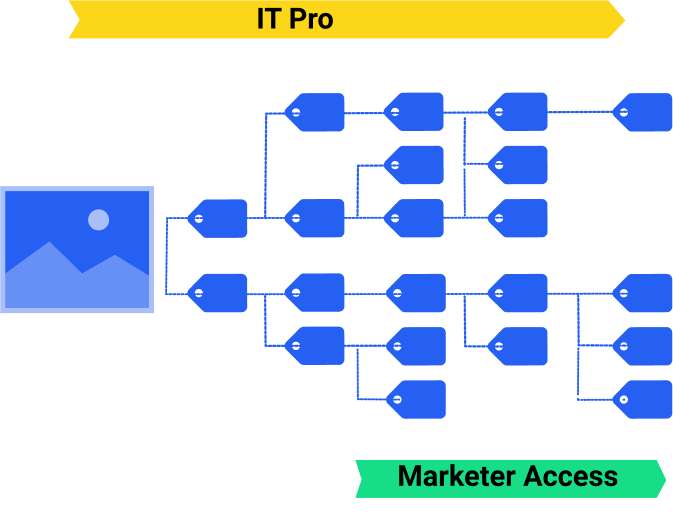
You will benefit significantly, however, from giving your marketing team midlevel access to GTM. “View and edit” access is perfect for the people who will often be proposing edits and new tags. This permissions level allows marketing to change or add tags, macros, and rules as necessary without ever having to knock on IT’s door. When they’re finished, a Master User can verify their changes in preview mode and publish them if they look good.
This way, marketing can make changes immediately – exactly as they want them – when starting or modifying a campaign. The midlevel permissions keep marketing from mistakenly doing any damage to the live site but also leave IT free to do higher-level projects. IT need only review and publish the changes then, radically reducing tag-deployment times.
![]()
![]()
There’s a reason some people go into marketing and others go into IT. If we could trust the marketing folks with unfettered access to complex website code, IT would be out of a job. But certain tasks are best left to the experts, and Google Tag Manager respects that delineation. Google has anticipated the fiascos that might ensue if tech-challenged marketing types had carte blanche with website tags. GTM’s user-permission hierarchy is the product of their foresight.
In this chapter we’ll explain how to add and manage users in your GTM account. We’ll also tell you how to create account- and container-level permissions to give your users the appropriate level of control and access. Finally, to prove that we have nothing but love for our right-brained friends in marketing, we’ll discuss why it would behoove you to give marketers a certain level of access to the tag management system.
A good rule of thumb is to set up one account per company and one container per website. The account is the highest level of organization. You can create an account in seconds by visiting Google Tag Manager’s homepage and signing up. If you need to create more accounts, you can do so by clicking “Account List” and then “New Account” as shown below. To help you stay organized, name the account after your company and your containers after the websites using them.
To manage the users associated with your account, go to the “All Accounts” page and select the account you want. In that screen you can view a list of the account’s users by clicking on the “Users” tab. That screen displays each user’s email address. If you want to add a user to the account, click the red “New” button, and a drop-down screen will appear. Click “User” as shown in the screenshot below.
If you want to change a user’s permissions, choose his/her name or email address from the user list. On the “Account User Settings” page, you can set up their account and container permissions with the associated drop-down menus. Make sure you hit “Save” once you’re done to preserve the changes. You can also remove a user at any time by clicking the “Delete This User” button in the bottom right-hand corner of the “Account User Settings” page.
Keep in mind that any time you add users, they will be able to view all the containers associated with your account unless you change their permissions. That’s a perfect segue into our next section …
GTM offers two levels of permissions: account and container. At the account level, a user can only have two types of permissions. The first is “View only,” which controls access based on the container permissions given to him/her for each container. For instance, if you assign User B “No access” to Container 1, User B will not even be able to see Container 1 in the account.
Alternatively, the “View, Edit, and Manage” permission level grants the user at least “View only” access to all the account’s containers. Beyond that, the container permissions you assign to the user will still dictate his/her level of access to the container. In other words, you can block a user with “View, Edit, and Manage” account permission from editing and managing containers, but not from viewing them.
You assign these permissions on a container-by-container basis. For every container you can choose among four user-access options:
> No access. The user can’t see the container listed in the account.
> View only. The user can see the container and view its tags, macros, and rules.
> View and edit. The user can add and modify a container’s tags, macros, and rules.
> View, edit, delete, and publish. The user can add, edit, and delete a container’s tags, macros, and rules and publish the modifications to the live site. The user has access to every function of GTM.
The reason behind GTM’s user-permission hierarchy is the same reason we keep children away from power tools. In the right hands, power tools can and do build marvelous things. But in inexperienced and unskilled hands they are a recipe for disaster. Publishing incorrect tags can cause you serious problems, including lost data, lost sales, and even site crashes. User permissions let you give the right people the right level of access to avert these disasters.
Think about limiting the highest level of container permissions to two people at most. Creating just one or two of these “Master Users” does two things for you. First, you have a point person who can answer for any snafus. Clear accountability motivates the Master User to make sure the tagging is done correctly. Second, if problems arise, you can easily trace them to one or two users when troubleshooting.
Recall the previous chapters where we extolled the many virtues of Google Tag Manager. We practically burst into song over the independence GTM gives marketers, who are no longer at the mercy of the webmaster’s queue. Now, all these insinuations that marketers are to tags what children are to power saws. Doesn’t limiting marketers’ access to GTM defeat its purpose of putting analytics back in the hands of the measurement experts?
Activities like deleting and publishing tags can wreak havoc on your site and your data if done improperly. For that reason, IT and IT only should have the highest-level permissions in GTM.
You will benefit significantly, however, from giving your marketing team midlevel access to GTM. “View and edit” access is perfect for the people who will often be proposing edits and new tags. This permissions level allows marketing to change or add tags, macros, and rules as necessary without ever having to knock on IT’s door. When they’re finished, a Master User can verify their changes in preview mode and publish them if they look good.
This way, marketing can make changes immediately – exactly as they want them – when starting or modifying a campaign. The midlevel permissions keep marketing from mistakenly doing any damage to the live site but also leave IT free to do higher-level projects. IT need only review and publish the changes then, radically reducing tag-deployment times.
![]()
![]()