Complete Guide To

Complete Guide To

At this point in our guide, you have the knowledge base you’ll need to implement GTM successfully. Now you just need to know how to synthesize and apply that information to get GTM up and running. Chapter 7 will teach you how to do that.

Think of this chapter as the instructions that come with your bodacious LEGO Batcave kit. You have all the LEGOs ready to go, and it’s finally time to crack the instruction manual and start building. Chapter 7 will take you through the eight-step GTM implementation process, from creating a structure to pushing your changes live. We’ll also discuss the various GTM implementation methods and how to choose the right one. At the end of this chapter, your tags will be as much at home in GTM as Alfred and Batman are in the ‘Cave.
The first step in implementing GTM is creating an account and generating a container snippet. We covered how to create an account in detail in Chapter 4, so this will be a quick review. It’s a good idea to have one GTM account per company and one container per website, or domain.
Note that the URLs to sign up for an account will differ based on what version of GTM you use. The URLs will remain different until GTM V2 replaces Version 1 in June. For GTM V1, click the “sign up” button and follow the prompts to start your account and generate a container snippet. Follow the same process for GTM V2, but remember you will not be able to view old GTM accounts in V2 until you migrate your account.
You will then want to click on “create new account” on GTM’s homepage. Name your account after your business and you check “share data anonymously with Google and others” – doing so will enable benchmarking. Once you’ve named your account, the next step is to create a container, which will manage your data and code. Name your container after your website (e.g., “www.mywebsite.com”) and let GTM know where you plan to use the container (on your site, an iOS app, or an Android app).
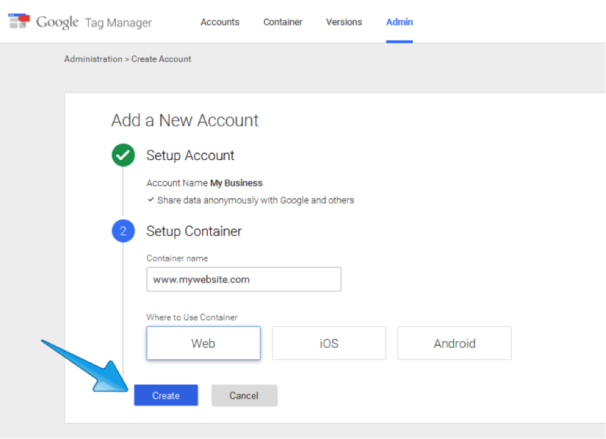
When you’re finished, click “Create” in Version 2 or “Create Account” in Version 1. Accept the terms of service by clicking “Yes,” and it’s official: you’ve created a GTM account and container. Remember, though, that you won’t have any tags at this point because you haven’t specified what you’d like to track.
Placing the right tags on the right pages of your site is how you collect the best data, and mapping out your site beforehand will help you ensure proper tag placement. Before you write or edit a single line of code, think about what visitor activities, or events, you’d like to measure. Define the data you want to collect, and choose the vendors you’ll use to gather that information. You might also want to record where your existing tags are implemented. See Chapter 3 for specific instructions on site mapping.
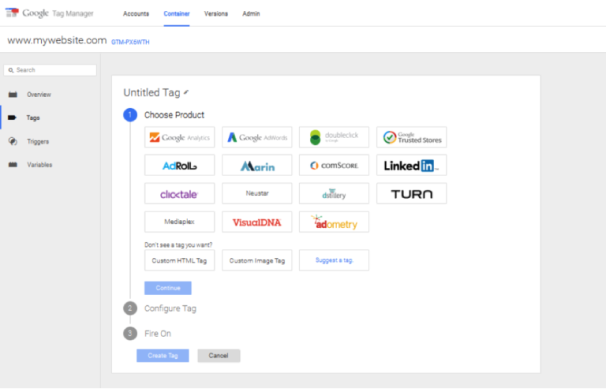
To help you brainstorm, we’ve included a screenshot of GTM V2’s tag templates below. Remember you can also create custom HTML tags by putting the code in on your own and letting GTM take it from there.
Now it’s time to copy and paste the GTM container snippet, or primary chunk of code, into every page of your site. After you created your account and container, you should’ve seen a screen like this:
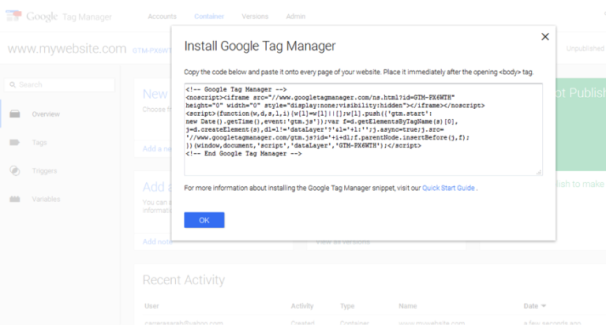
Copy the code from this window and paste it into each page of your site immediately after thetag. Theoretically, you can place the snippet anywhere below, but you cannot paste it in the head. If you closed out the above screen without copying and pasting, no worries. Just go to “Users & Settings>Settings” and copy the container snippet at the bottom of the page. Note that WordPress users can just use this plugin.
For reasons explained in Chapter 5, this step is optional but strongly recommended. Adding a data layer to your site will make it much easier for it to relay information to GTM. Data layer APIs (application programming interfaces) let you track data and events across many tags.
Creating a data layer and adding Google’s APIs will let you store transaction data, reference variables, page categories, and other critical information in it. A data layer is simply JavaScript that you place in theof your site to ensure that it loads before your container snippet. That way, the data layer will be accessible when firing rules request information from it.
You’ll need the site map you created in Step 2 for this process. At this point, you’ll create tags to populate your container according to the tag vendors you chose in Step 2. You’ll also create new rules for those tags based on the events you wish to track, and you’ll create macros to hold the data you want to gather (e.g., item price). This step is where you’ll see the most divergence between GTM Version 1 and GTM V2. GTM V2 users should know that the new interface calls rules “triggers” and macros “variables.”
For most of you, the first tag you’ll want to create is Google Analytics (GA). You can implement GA with Google Tag Manager in two ways, both of which we’ll explain in this step. For those of you with fairly straightforward websites and simple implementations, the standard GA implementation is probably best. If you have a more complex website or implementation, the generic HTML tag method might work better. For example, the generic HTML tag method is preferable if you need to track across multiple domains, or websites.
Standard GA Tag Implementation
From your account screen, click on the name of your container. In GTM V1, click on “Tags” – the screen should show that you have none so far – and then click the red “New” button.
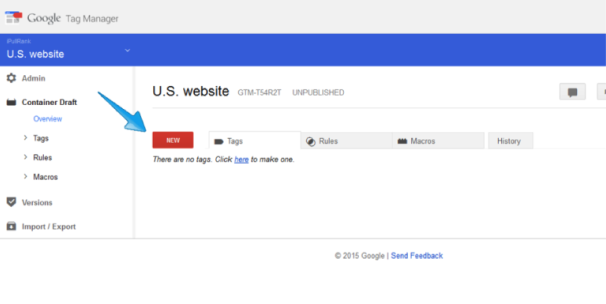
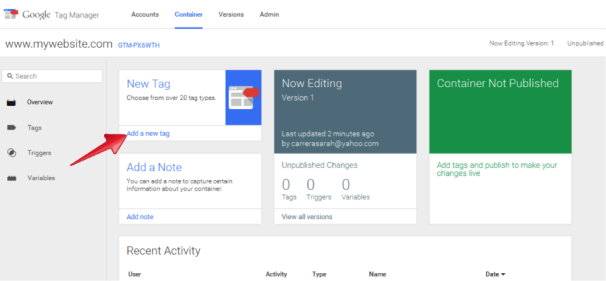
In GTM V2, the “New Tag” option will be in the top left of your account’s home screen, pictured below.
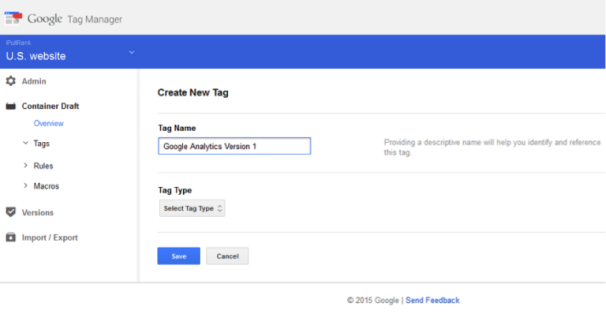
Next, name your tag. As you can see below, we named ours after Google Analytics and the version we used (V1).
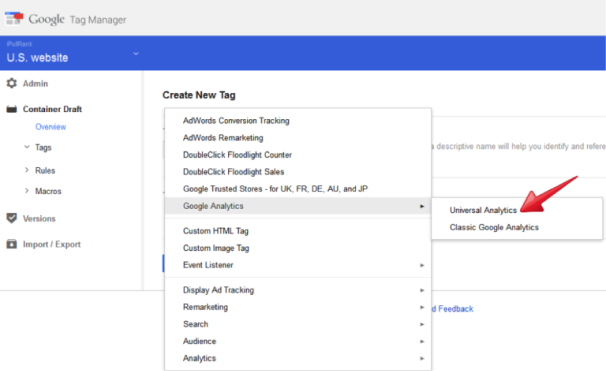
You’ll then need to choose the tag type. Google has Universal Analytics (UA) as the default, but depending on the version of Google Analytics you’re using, you may instead have to choose “Classic Analytics” in the drop-down menu. If you’re still using Classic, though, now is an ideal time to upgrade to Universal and take advantage of its many benefits.
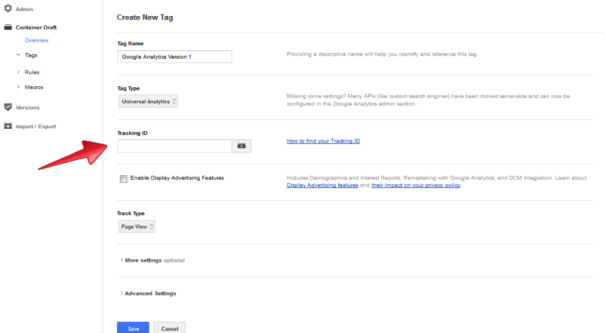
After choosing your version of GA, you’ll need to enter your tracking ID from Classic or Universal. You’ll also have to choose whether to display advertising features. On the up side, doing so will help you collect demographic data in GA. On the other hand, these features will also affect your privacy policy, so be sure to update it before enabling them.
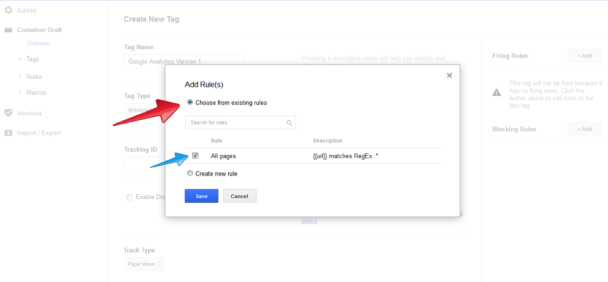
The next step is to create a rule telling your GA tag when to fire. The screenshot below shows how to initiate that process.
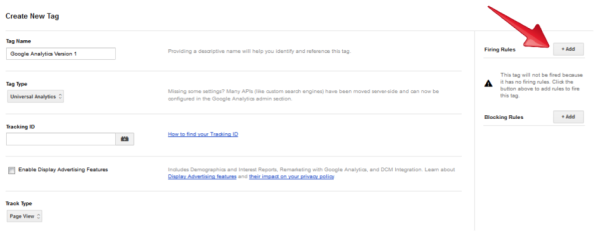
For most sites you’ll want your GA tag to fire on all pages, so select the “All pages” checkbox and hit “Save” in the screen below.
Your site’s first tag is now ready to publish after you preview and test it in Step 6.
The Generic HTML Tag Implementation Method
The generic HTML tag is an alternative way to implement Google Analytics with GTM. The generic HTML tag method is better-suited for complex implementations. You can put anything you want into GTM’s generic HTML tag, including the GA tracking code and any customized code. In the “Add a New Tag” screen in GTM V1, choose “Custom HTML Tag” in the tag type drop-down menu.
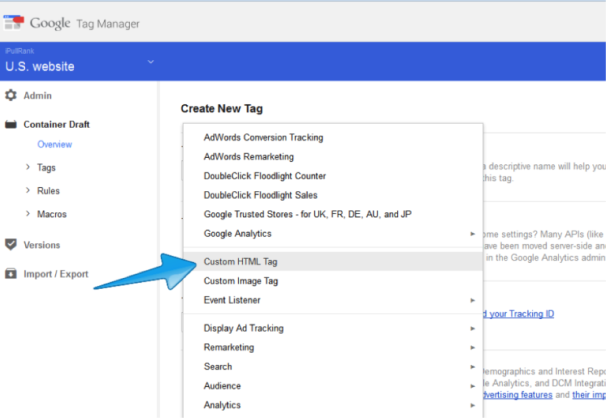
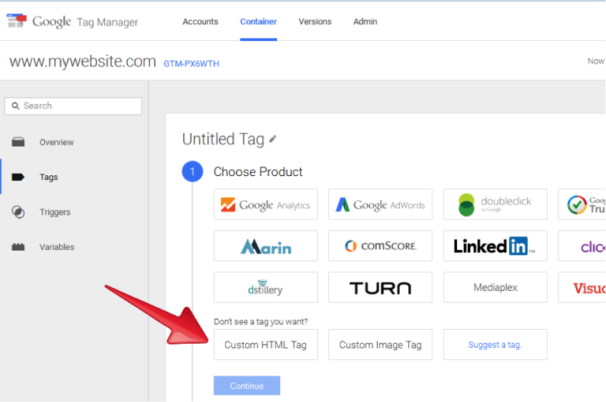
In GTM V2, select “Custom HTML Tag” from the “Choose Product” portion of the “Add a New Tag” screen.
You can then input the GA tag in the “HTML” field, customizing it however you want. Obviously, this method is much more work than the standard tag implementation method, but it will help complex implementations go more smoothly.
Helpful GTM Rules
There are a handful of firing rules you’ll find yourself following over and over in GTM, so we’ve summarized a few below.
{{url}} matches regex .* – fire tag on every page as soon as possible
{{event}} equals gtm.js – fire tag as soon as possible
{{event}} equals gtm.dom – fire tag after DOM loads. Note that this is not the same as #5, the loading of the page. The DOM loading means it’s getting and parsing all HTML code, rendering the page, and running the scripts that need to run once it’s time for the page to load. The page load is an entirely separate event.
{{event}} equals gtm.formSubmit – fire tag when a Form Submit Listener reports a form submission
{{event}} equals gtm.load – fire tag after page loads
{{event}} equals gtm.click – fire tag when a Click Listener detects a click
{{event}} equals gtm.linkClick – fire tag when a Link Click Listener
detects a link click
Now you finally get to see the fruits of your labor and make sure the tag(s) you created are functioning properly. From the “Overview” screen in Version 1, click “Create Version” in the top right corner.

Once you do, the “Preview” option will appear in the top right corner.
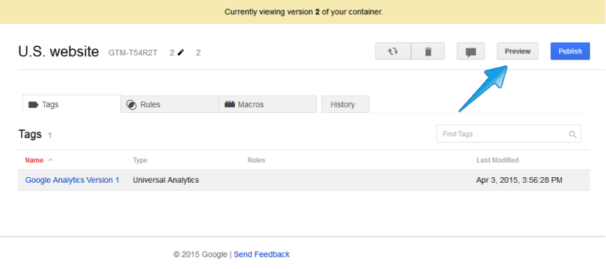
Clicking “Preview” will allow you to choose between “Preview” and “Debug” modes, which will help you test your site and determine which tags are firing correctly. Browse your site to see if your rules and tags are behaving the way you expect. More on this in Chapters 11 and 12.
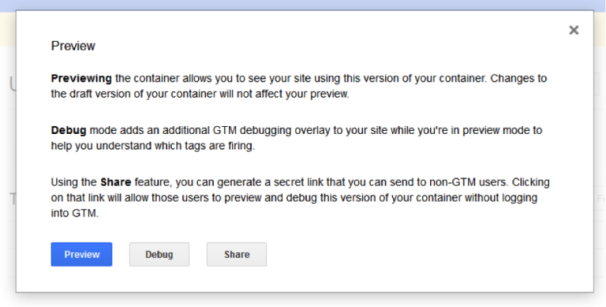
The preview process is slightly different in GTM Version 2. In the top right corner of the “Overview” screen, you’ll see a red button that says “Publish.” Click on the arrow within that button to view and select the “Preview and Debug” option. Once you’ve checked your site over, exit preview mode.

You are almost ready to “migrate” to Google Tag Manager. Migration simply means removing hard-coded tags from your site. Google recommends staging these changes in a quality assurance (QA)/test environment. It’s also a good idea to remove the hard-coded tag as soon as it’s deployed in GTM. Otherwise, you risk double-tagging, which can wreak havoc on your data.
You’re finally ready to publish your site sans hard-coded tags. You’ll want to hit “Publish” on GTM (same for both versions) to publish your new container. GTM will ask you to confirm your publishing request, and then your changes will go live immediately. At last, your tags have a home that rivals even the Batcave’s level of awesomeness.
![]()
![]()
At this point in our guide, you have the knowledge base you’ll need to implement GTM successfully. Now you just need to know how to synthesize and apply that information to get GTM up and running. Chapter 7 will teach you how to do that.
Think of this chapter as the instructions that come with your bodacious LEGO Batcave kit. You have all the LEGOs ready to go, and it’s finally time to crack the instruction manual and start building. Chapter 7 will take you through the eight-step GTM implementation process, from creating a structure to pushing your changes live. We’ll also discuss the various GTM implementation methods and how to choose the right one. At the end of this chapter, your tags will be as much at home in GTM as Alfred and Batman are in the ‘Cave.
The first step in implementing GTM is creating an account and generating a container snippet. We covered how to create an account in detail in Chapter 4, so this will be a quick review. It’s a good idea to have one GTM account per company and one container per website, or domain.
Note that the URLs to sign up for an account will differ based on what version of GTM you use. The URLs will remain different until GTM V2 replaces Version 1 in June. For GTM V1, click the “sign up” button and follow the prompts to start your account and generate a container snippet. Follow the same process for GTM V2, but remember you will not be able to view old GTM accounts in V2 until you migrate your account.
You will then want to click on “create new account” on GTM’s homepage. Name your account after your business and you check “share data anonymously with Google and others” – doing so will enable benchmarking. Once you’ve named your account, the next step is to create a container, which will manage your data and code. Name your container after your website (e.g., “www.mywebsite.com”) and let GTM know where you plan to use the container (on your site, an iOS app, or an Android app).
When you’re finished, click “Create” in Version 2 or “Create Account” in Version 1. Accept the terms of service by clicking “Yes,” and it’s official: you’ve created a GTM account and container. Remember, though, that you won’t have any tags at this point because you haven’t specified what you’d like to track.
Placing the right tags on the right pages of your site is how you collect the best data, and mapping out your site beforehand will help you ensure proper tag placement. Before you write or edit a single line of code, think about what visitor activities, or events, you’d like to measure. Define the data you want to collect, and choose the vendors you’ll use to gather that information. You might also want to record where your existing tags are implemented. See Chapter 3 for specific instructions on site mapping.
To help you brainstorm, we’ve included a screenshot of GTM V2’s tag templates below. Remember you can also create custom HTML tags by putting the code in on your own and letting GTM take it from there.
Now it’s time to copy and paste the GTM container snippet, or primary chunk of code, into every page of your site. After you created your account and container, you should’ve seen a screen like this:
Copy the code from this window and paste it into each page of your site immediately after thetag. Theoretically, you can place the snippet anywhere below, but you cannot paste it in the head. If you closed out the above screen without copying and pasting, no worries. Just go to “Users & Settings>Settings” and copy the container snippet at the bottom of the page. Note that WordPress users can just use this plugin.
For reasons explained in Chapter 5, this step is optional but strongly recommended. Adding a data layer to your site will make it much easier for it to relay information to GTM. Data layer APIs (application programming interfaces) let you track data and events across many tags.
Creating a data layer and adding Google’s APIs will let you store transaction data, reference variables, page categories, and other critical information in it. A data layer is simply JavaScript that you place in theof your site to ensure that it loads before your container snippet. That way, the data layer will be accessible when firing rules request information from it.
You’ll need the site map you created in Step 2 for this process. At this point, you’ll create tags to populate your container according to the tag vendors you chose in Step 2. You’ll also create new rules for those tags based on the events you wish to track, and you’ll create macros to hold the data you want to gather (e.g., item price). This step is where you’ll see the most divergence between GTM Version 1 and GTM V2. GTM V2 users should know that the new interface calls rules “triggers” and macros “variables.”
For most of you, the first tag you’ll want to create is Google Analytics (GA). You can implement GA with Google Tag Manager in two ways, both of which we’ll explain in this step. For those of you with fairly straightforward websites and simple implementations, the standard GA implementation is probably best. If you have a more complex website or implementation, the generic HTML tag method might work better. For example, the generic HTML tag method is preferable if you need to track across multiple domains, or websites.
Standard GA Tag Implementation
From your account screen, click on the name of your container. In GTM V1, click on “Tags” – the screen should show that you have none so far – and then click the red “New” button.
In GTM V2, the “New Tag” option will be in the top left of your account’s home screen, pictured below.
Next, name your tag. As you can see below, we named ours after Google Analytics and the version we used (V1).
You’ll then need to choose the tag type. Google has Universal Analytics (UA) as the default, but depending on the version of Google Analytics you’re using, you may instead have to choose “Classic Analytics” in the drop-down menu. If you’re still using Classic, though, now is an ideal time to upgrade to Universal and take advantage of its many benefits.
After choosing your version of GA, you’ll need to enter your tracking ID from Classic or Universal. You’ll also have to choose whether to display advertising features. On the up side, doing so will help you collect demographic data in GA. On the other hand, these features will also affect your privacy policy, so be sure to update it before enabling them.
The next step is to create a rule telling your GA tag when to fire. The screenshot below shows how to initiate that process.
For most sites you’ll want your GA tag to fire on all pages, so select the “All pages” checkbox and hit “Save” in the screen below.
Your site’s first tag is now ready to publish after you preview and test it in Step 6.
The Generic HTML Tag Implementation Method
The generic HTML tag is an alternative way to implement Google Analytics with GTM. The generic HTML tag method is better-suited for complex implementations. You can put anything you want into GTM’s generic HTML tag, including the GA tracking code and any customized code. In the “Add a New Tag” screen in GTM V1, choose “Custom HTML Tag” in the tag type drop-down menu.
In GTM V2, select “Custom HTML Tag” from the “Choose Product” portion of the “Add a New Tag” screen.
You can then input the GA tag in the “HTML” field, customizing it however you want. Obviously, this method is much more work than the standard tag implementation method, but it will help complex implementations go more smoothly.
Helpful GTM Rules
There are a handful of firing rules you’ll find yourself following over and over in GTM, so we’ve summarized a few below.
{{url}} matches regex .* – fire tag on every page as soon as possible
{{event}} equals gtm.js – fire tag as soon as possible
{{event}} equals gtm.dom – fire tag after DOM loads. Note that this is not the same as #5, the loading of the page. The DOM loading means it’s getting and parsing all HTML code, rendering the page, and running the scripts that need to run once it’s time for the page to load. The page load is an entirely separate event.
{{event}} equals gtm.formSubmit – fire tag when a Form Submit Listener reports a form submission
{{event}} equals gtm.load – fire tag after page loads
{{event}} equals gtm.click – fire tag when a Click Listener detects a click
{{event}} equals gtm.linkClick – fire tag when a Link Click Listener
detects a link click
Now you finally get to see the fruits of your labor and make sure the tag(s) you created are functioning properly. From the “Overview” screen in Version 1, click “Create Version” in the top right corner.
Once you do, the “Preview” option will appear in the top right corner.
Clicking “Preview” will allow you to choose between “Preview” and “Debug” modes, which will help you test your site and determine which tags are firing correctly. Browse your site to see if your rules and tags are behaving the way you expect. More on this in Chapters 11 and 12.
The preview process is slightly different in GTM Version 2. In the top right corner of the “Overview” screen, you’ll see a red button that says “Publish.” Click on the arrow within that button to view and select the “Preview and Debug” option. Once you’ve checked your site over, exit preview mode.
You are almost ready to “migrate” to Google Tag Manager. Migration simply means removing hard-coded tags from your site. Google recommends staging these changes in a quality assurance (QA)/test environment. It’s also a good idea to remove the hard-coded tag as soon as it’s deployed in GTM. Otherwise, you risk double-tagging, which can wreak havoc on your data.
You’re finally ready to publish your site sans hard-coded tags. You’ll want to hit “Publish” on GTM (same for both versions) to publish your new container. GTM will ask you to confirm your publishing request, and then your changes will go live immediately. At last, your tags have a home that rivals even the Batcave’s level of awesomeness.
![]()
![]()