Complete Guide To

Complete Guide To

Before Google introduced Auto-Event Tracking in 2013, a lot of code-averse GTM users (read: marketers) felt shortchanged. GTM’s big selling point was that you could add and edit your website’s tags without ever having to mess with your code. Yet, in order to track the events that occur on your pages, you had to somehow identify them, which required custom coding.
It wasn’t until Auto-Event Tracking’s debut that GTM truly eliminated the need to code. GTM is now equipped with automated listening for specific events, thereby reducing the need for custom code and making event-tracking possible without ever changing site’s code. Chapter 8 walks you through auto-event tracking step by step. You’ll learn how to track various events, including link clicking, all clicks, form submit, and timed intervals.

What outbound links your visitors click on your site and how often is valuable information to have. To our great chagrin, though, Google Analytics does not automatically track outgoing links. But don’t despair – GTM saves the day with its Link Click Listener Tag. Here’s how to create that tag and the rule that makes it fire in GTM Version 1:
1. Create a Link Click Listener Tag
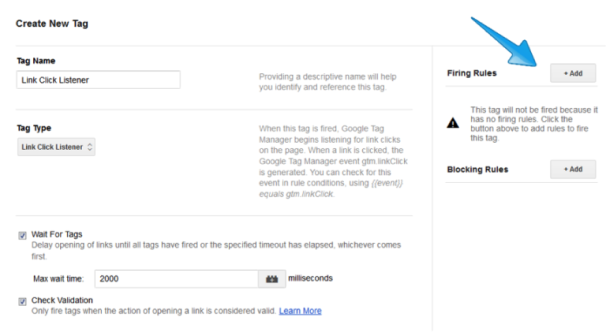
Go to the “Tags” page and click “New > Tag.” Name the tag Link Click Listener and select the “Event Listener > Link Click Listener” tag type.
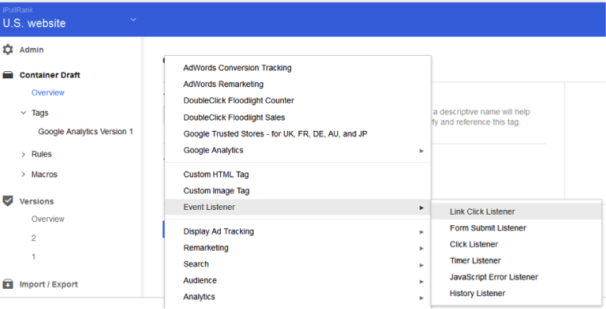
Click “+Add” next to “Firing Rules” and check “All pages.” Hit “Save.”
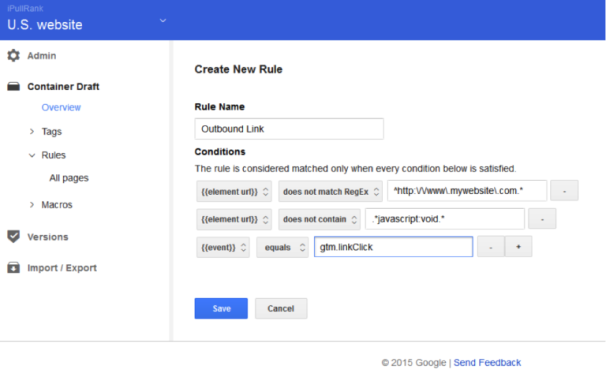
This rule will define which clicks are outgoing link clicks. On the “Rules” screen, click “New > Rule.” Name the rule “Outbound Link,” set the following three conditions, and hit “Save.”
> {{element url}} does not match Regex (place your website’s Regex here; for example, ^http:\/\/www\.mywebsite\.com.*)
> {{element url}} does not contain javascript:void
> {{event}} equals gtm.linkClick
In nongeek speak, this rule tells GTM that if the link’s URL is not on your site, not a snippet of code (e.g., a dynamic button), and is clicked by a user, GTM should do something. What GTM does then depends on which tags you attach to the rule.
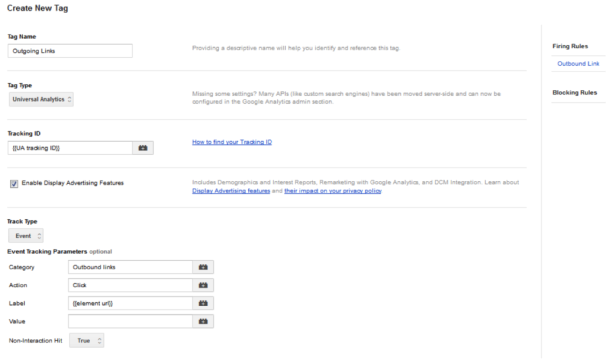
From the “Tags” screen, select “New > Tag.” Name the tag “Outgoing Links,” and then select “Google Analytics > Universal Analytics or Classic Google Analytics” as the tag type depending on which version of GA you use. Enter the tracking ID associated with your GA account. In “Firing Rules,” add “Outbound Link.” Select “Event” as the Track Type, and set the event-tracking parameters to the following:
> Category: Outbound links
> Action: Click
> Label: {{element url}}
> Non-Interaction Hit: True
When you hit “Save,” your screen should look exactly like this except for the Tracking ID field:
You’ll want to save a version of your container at this point so you can revert to it if things go wrong down the line. Clicking the pencil button next to the Version Name (a number by default) will allow you to name the version for the changes you made (e.g., “Outgoing Links”). Now you’re ready to preview and debug your changes. Chapter 11 explains in detail how to preview and test. Once you do, you’re ready to click “Publish.”
Google went and outdid itself in Version 2. In the new version of GTM, you no longer need Auto-Event Listener Tags; event-tracking is completely driven by triggers. For you old-timers out there, “trigger” is what the kids are calling a rule these days. A trigger-based approach means that you initiate and specify your desired auto-event tracking with tag triggers. For example, if you wanted to fire a click-based tag, you would just create a trigger of type “Click,” and that’s the end of it.
Because auto-event tracking in GTM V2 is so different from GTM V1, we’ve dedicated an entire section to the process. GTM V2’s auto-event tracking process is very consistent across different events, so once you do it for one event, you should be able to handle others. For our teaching example, we’ve chosen outbound links as the event and summarized the process of tracking outbound links in GTM V2 in four simple steps:
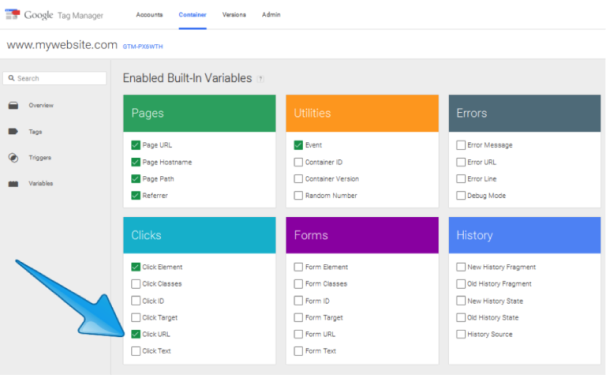
1. Set Your Built-In Variables. Some of the biggest timesavers in GTM V2 are built-in variables – checkboxes that allow you to quickly activate the variables you use most for your tags. For an outbound links tag, you only want to trigger it when the clicked link’s URL does not match your domain. To do that, you’ll need to enable the “Click URL” variable, which replaces the {{element url}} macro from Version 1. You can do this by choosing “Variables” from the left-hand menu in GTM.
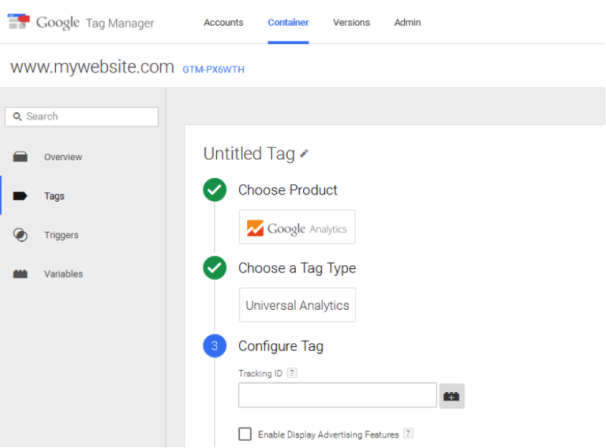
2. Create Your Tag. From the “Tags” screen, create a new Google Analytics tag. The tag type will depend on whether you use Universal or Classic GA. Choose “Click” for what triggers the tag to fire.
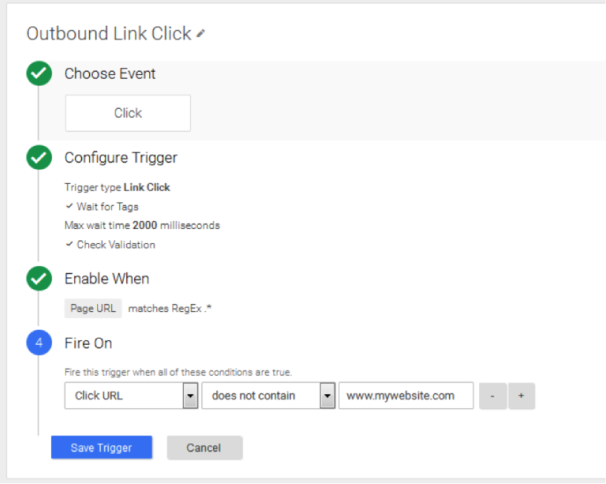
3. Create a Trigger. Now it’s time to create a Link Click trigger that will bring your tag to life. In the “Triggers” screen, select “New.” We named our trigger “Outbound Link Click” by clicking the pencil next to the title field. Select “Click” under “Choose Event.” Under “Configure Trigger,” choose Trigger Type “Link Click.” Under “Enable When,” enter “Page URL matches RegEx .*” (meaning the trigger will be enabled on all your pages).
Notice that “Wait for Tags” and “Check Validation” are both checked by default. “Wait for Tags” means the trigger waits for all associated tags to fire before it proceeds with the link’s redirect action. “Check Validation” means dependent tags will only fire if the link click is valid. In other words, dependent tags won’t fire if other JavaScript on the page stopped the link’s default action.
Under the “Fire On” option, choose “Some Clicks” – you only want the tag to fire with clicks that lead outside your website. Set the trigger to fire when “Click URL does not contain www.yourdomain.com,” or it will fire on every link click, including clicks to internal pages of your site.
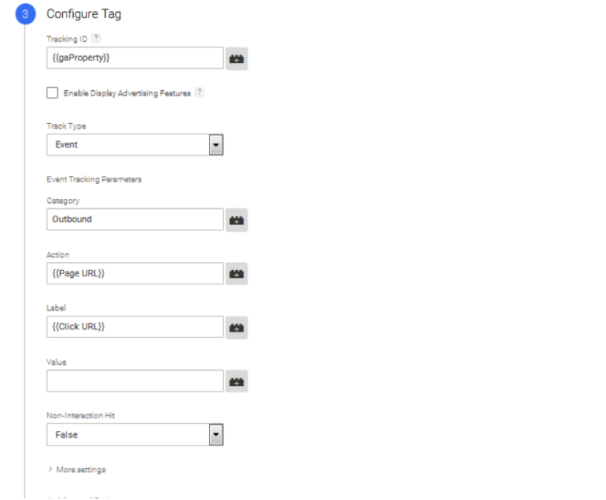
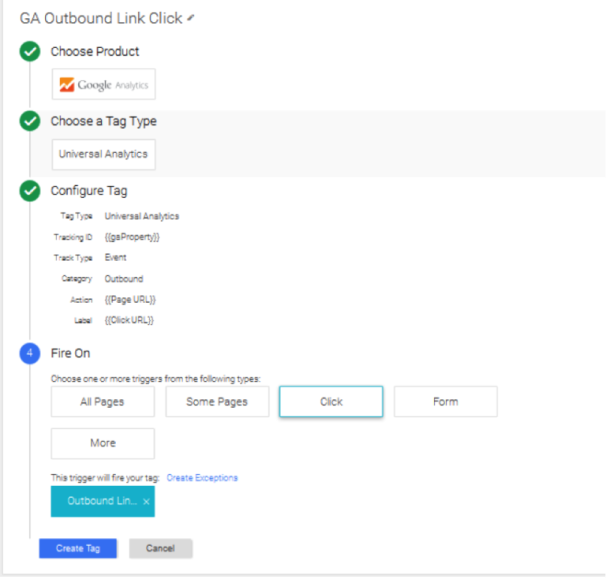
4. Complete Your Tag. Now it’s time to fill in your tracking ID and the parameters of your tag’s event-tracking. You’ll first want to name the tag, preferably something that identifies it as a Google Analytics tag for outgoing-link tracking. Next, choose “Event” as the track type and fill in the remaining fields according to the screenshot below.
Save, preview, and debug your tag, and you’re ready to publish.
Have you ever noticed that the bounce rate – the percentage of sessions in which a visitor left your site from the entrance page without any page interaction – is especially high for your most content-dense pages? Perhaps you’ve chalked the correlation up to the fact that Internet users have the attention spans of gnats and are put off by content-heavy pages. While that may be true, it’s also possible that your visitors aren’t really bouncing.
When a user goes 30 minutes without triggering an event on a page, Google Analytics sessions time out by default. But the absence of page interaction doesn’t necessarily mean the visitor has left your site; it could simply mean that he/she is watching a video or reading lots of content. Visitors whose last interaction is a pageview get assigned a page time of zero by GA. It could be that the visitor spent 45 minutes or even hours engaged with your page, but you won’t know that without timed interval tracking.

Timed intervals implement a “keepalive event” to ensure activity is sent on a regular basis. That way, you can prevent your sessions from timing out unnecessarily and improve your data collection. Follow these steps to create a 25-minute timer in GTM V2:
1. Add a page tracking tag. Choose a Google or Universal Analytics Tag Type and a “Page View” Track Type. Set the tag to fire on “All pages.”
2. Create a new trigger with the following parameters:
> Type: Timer
> Filter: URL matches RegEx.*
> Trigger Name: Session Timer
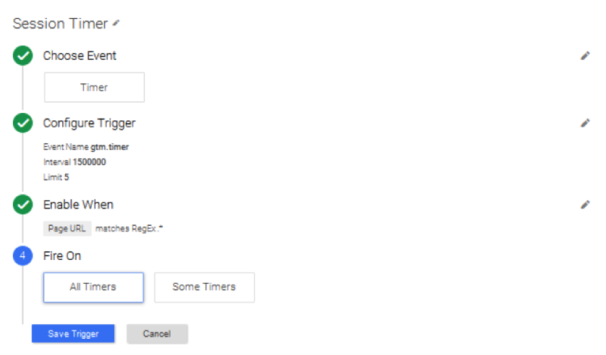
> Event Name: gtm.timer
> Interval (in milliseconds): 1500000
> Limit: 5 (means event will be fired a maximum of five times. Leave blank to keep the event firing until user leaves page)
3. Add an Analytics event tracking tag. Choose a Google or Universal Analytics Tag Type and an “Event” Track Type. Enter a Category, Action, and Label for the event. Add the “Session Timer” trigger you created in Step 2 by selecting “More” under the “Fire On” menu.
4. Save a version of your container, preview, debug, and publish.

Visitors will occasionally click on something on your site that is not a traditional link and, thus, ducks your link-click tracking tags. For instance, a visitor might download a PDF on your site or click on one of your images. Or, a link might be rendered on a different element with a JavaScript onClick handler. Clicks like that show engagement and are worth tracking, but how? Let’s say you want to create a Google Analytics event every time a visitor clicks on an image with the ID: “Gallery_Image.” Here’s how you would do that in GTM V2 in four steps:
1. Add a page tracking tag. Choose a Google or Universal Analytics Tag Type and a “Page View” Track Type. Set the tag to fire on “All pages.”
2. Create a new trigger with the following parameters:
> Type: Click
> Filter: Element ID contains Gallery_Image (Note: your interface might not have “Element ID” as an option for the first field in the filter. If that’s the case, choose “New Variable” from that field’s drop-down menu as shown below.)
Once you click on “New Variable,” you’ll see a pop-up screen like the one below. Under “Choose Type,” select “Auto-Event Variable.” Under “Variable Type,” select “Element ID” and name the new variable.
Your trigger should look like this when you’re finished:
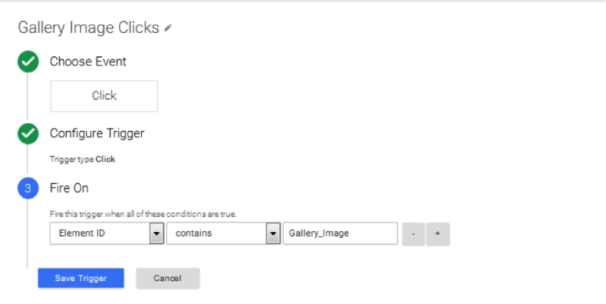
> Trigger Name: Gallery Image Clicks
> Trigger Type: All elements
NOTE: In GTM V2, creating a ‘Click’ trigger automatically activates GTM Auto-Event Listening when you publish your container.
3. Add an Analytics event tracking tag. Choose a Google or Universal Analytics Tag Type and an “Event” Track Type. Add the “Gallery Image Clicks” trigger you created in Step 2. Complete the “Category,” “Action,” and “Label” fields for the event. Try using the following:
> Category: “All”
> Action: “Click”
> Label: “All”
4. Save a version of your container, preview, debug, and publish.
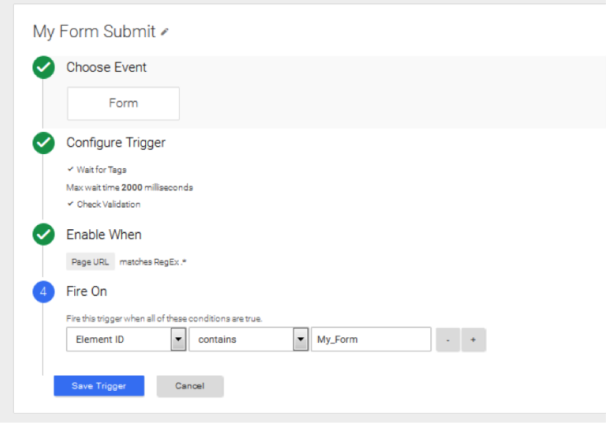
Form submit tracking allows you to record every time a visitor submits a form on your site. You can set up triggers to fire a tag whenever a submit event takes place for any form on your site. Alternatively, you can customize your triggers to fire a tag only when a visitor submits a specific form. Say you have a form on your site that visitors can fill out for a free quote. We’ll name the form “My_Form.” Here’s how to track every submission of that form in GTM V2:
1. Add a page tracking tag. Choose a Google or Universal Analytics Tag Type and a “Page View” Track Type. Set the tag to fire on “All pages.”
2. Create a new trigger with the following parameters:
> Type: Form
> Enable When: To have the My Form Submit trigger listen for submit events on all pages, choose “Page URL matches RegEx .*” However, you may wish to customize this if “My_Form” can only be found on certain pages.
> Filter: Under “Fire On,” choose “Some Forms” and then enter: “Element ID contains My_Form”
> Trigger Name: My Form Submit
> Wait for Tags: Check (this will postpone the form submit until every dependent tag has fired or the max wait time has expired, whichever happens first)
> Max Wait Time: Appropriate time is up to you; we recommend 2000ms
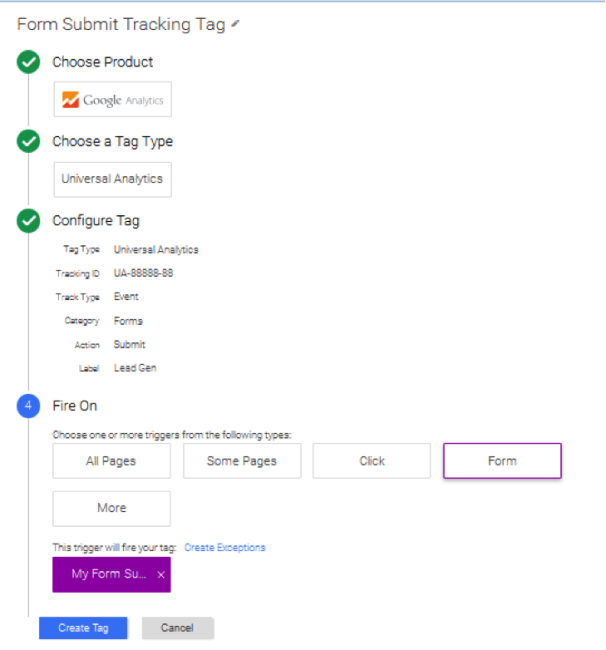
3. Add an Analytics event tracking tag. Choose a Google or Universal Analytics Tag Type and an “Event” Track Type. Add the “My Form Submit” trigger you created in Step 2 by clicking “Form” under “Fire On” and selecting it from the pop-up menu. Complete the “Category,” “Action,” and “Label” fields as follows:
> Category: “Forms”
> Action: “Submit”
> Label: “Lead Gen”
Your screen should look like this when you’re finished:
4. Save a version of your container, preview, debug, and publish.
![]()
![]()
Before Google introduced Auto-Event Tracking in 2013, a lot of code-averse GTM users (read: marketers) felt shortchanged. GTM’s big selling point was that you could add and edit your website’s tags without ever having to mess with your code. Yet, in order to track the events that occur on your pages, you had to somehow identify them, which required custom coding.
It wasn’t until Auto-Event Tracking’s debut that GTM truly eliminated the need to code. GTM is now equipped with automated listening for specific events, thereby reducing the need for custom code and making event-tracking possible without ever changing site’s code. Chapter 8 walks you through auto-event tracking step by step. You’ll learn how to track various events, including link clicking, all clicks, form submit, and timed intervals.
What outbound links your visitors click on your site and how often is valuable information to have. To our great chagrin, though, Google Analytics does not automatically track outgoing links. But don’t despair – GTM saves the day with its Link Click Listener Tag. Here’s how to create that tag and the rule that makes it fire in GTM Version 1:
1. Create a Link Click Listener Tag
Go to the “Tags” page and click “New > Tag.” Name the tag Link Click Listener and select the “Event Listener > Link Click Listener” tag type.
Click “+Add” next to “Firing Rules” and check “All pages.” Hit “Save.”
This rule will define which clicks are outgoing link clicks. On the “Rules” screen, click “New > Rule.” Name the rule “Outbound Link,” set the following three conditions, and hit “Save.”
> {{element url}} does not match Regex (place your website’s Regex here; for example, ^http:\/\/www\.mywebsite\.com.*)
> {{element url}} does not contain javascript:void
> {{event}} equals gtm.linkClick
In nongeek speak, this rule tells GTM that if the link’s URL is not on your site, not a snippet of code (e.g., a dynamic button), and is clicked by a user, GTM should do something. What GTM does then depends on which tags you attach to the rule.
From the “Tags” screen, select “New > Tag.” Name the tag “Outgoing Links,” and then select “Google Analytics > Universal Analytics or Classic Google Analytics” as the tag type depending on which version of GA you use. Enter the tracking ID associated with your GA account. In “Firing Rules,” add “Outbound Link.” Select “Event” as the Track Type, and set the event-tracking parameters to the following:
> Category: Outbound links
> Action: Click
> Label: {{element url}}
> Non-Interaction Hit: True
When you hit “Save,” your screen should look exactly like this except for the Tracking ID field:
You’ll want to save a version of your container at this point so you can revert to it if things go wrong down the line. Clicking the pencil button next to the Version Name (a number by default) will allow you to name the version for the changes you made (e.g., “Outgoing Links”). Now you’re ready to preview and debug your changes. Chapter 11 explains in detail how to preview and test. Once you do, you’re ready to click “Publish.”
Google went and outdid itself in Version 2. In the new version of GTM, you no longer need Auto-Event Listener Tags; event-tracking is completely driven by triggers. For you old-timers out there, “trigger” is what the kids are calling a rule these days. A trigger-based approach means that you initiate and specify your desired auto-event tracking with tag triggers. For example, if you wanted to fire a click-based tag, you would just create a trigger of type “Click,” and that’s the end of it.
Because auto-event tracking in GTM V2 is so different from GTM V1, we’ve dedicated an entire section to the process. GTM V2’s auto-event tracking process is very consistent across different events, so once you do it for one event, you should be able to handle others. For our teaching example, we’ve chosen outbound links as the event and summarized the process of tracking outbound links in GTM V2 in four simple steps:
1. Set Your Built-In Variables. Some of the biggest timesavers in GTM V2 are built-in variables – checkboxes that allow you to quickly activate the variables you use most for your tags. For an outbound links tag, you only want to trigger it when the clicked link’s URL does not match your domain. To do that, you’ll need to enable the “Click URL” variable, which replaces the {{element url}} macro from Version 1. You can do this by choosing “Variables” from the left-hand menu in GTM.
2. Create Your Tag. From the “Tags” screen, create a new Google Analytics tag. The tag type will depend on whether you use Universal or Classic GA. Choose “Click” for what triggers the tag to fire.
3. Create a Trigger. Now it’s time to create a Link Click trigger that will bring your tag to life. In the “Triggers” screen, select “New.” We named our trigger “Outbound Link Click” by clicking the pencil next to the title field. Select “Click” under “Choose Event.” Under “Configure Trigger,” choose Trigger Type “Link Click.” Under “Enable When,” enter “Page URL matches RegEx .*” (meaning the trigger will be enabled on all your pages).
Notice that “Wait for Tags” and “Check Validation” are both checked by default. “Wait for Tags” means the trigger waits for all associated tags to fire before it proceeds with the link’s redirect action. “Check Validation” means dependent tags will only fire if the link click is valid. In other words, dependent tags won’t fire if other JavaScript on the page stopped the link’s default action.
Under the “Fire On” option, choose “Some Clicks” – you only want the tag to fire with clicks that lead outside your website. Set the trigger to fire when “Click URL does not contain www.yourdomain.com,” or it will fire on every link click, including clicks to internal pages of your site.
4. Complete Your Tag. Now it’s time to fill in your tracking ID and the parameters of your tag’s event-tracking. You’ll first want to name the tag, preferably something that identifies it as a Google Analytics tag for outgoing-link tracking. Next, choose “Event” as the track type and fill in the remaining fields according to the screenshot below.
Save, preview, and debug your tag, and you’re ready to publish.
Have you ever noticed that the bounce rate – the percentage of sessions in which a visitor left your site from the entrance page without any page interaction – is especially high for your most content-dense pages? Perhaps you’ve chalked the correlation up to the fact that Internet users have the attention spans of gnats and are put off by content-heavy pages. While that may be true, it’s also possible that your visitors aren’t really bouncing.
When a user goes 30 minutes without triggering an event on a page, Google Analytics sessions time out by default. But the absence of page interaction doesn’t necessarily mean the visitor has left your site; it could simply mean that he/she is watching a video or reading lots of content. Visitors whose last interaction is a pageview get assigned a page time of zero by GA. It could be that the visitor spent 45 minutes or even hours engaged with your page, but you won’t know that without timed interval tracking.
Timed intervals implement a “keepalive event” to ensure activity is sent on a regular basis. That way, you can prevent your sessions from timing out unnecessarily and improve your data collection. Follow these steps to create a 25-minute timer in GTM V2:
1. Add a page tracking tag. Choose a Google or Universal Analytics Tag Type and a “Page View” Track Type. Set the tag to fire on “All pages.”
2. Create a new trigger with the following parameters:
> Type: Timer
> Filter: URL matches RegEx.*
> Trigger Name: Session Timer
> Event Name: gtm.timer
> Interval (in milliseconds): 1500000
> Limit: 5 (means event will be fired a maximum of five times. Leave blank to keep the event firing until user leaves page)
3. Add an Analytics event tracking tag. Choose a Google or Universal Analytics Tag Type and an “Event” Track Type. Enter a Category, Action, and Label for the event. Add the “Session Timer” trigger you created in Step 2 by selecting “More” under the “Fire On” menu.
4. Save a version of your container, preview, debug, and publish.
Visitors will occasionally click on something on your site that is not a traditional link and, thus, ducks your link-click tracking tags. For instance, a visitor might download a PDF on your site or click on one of your images. Or, a link might be rendered on a different element with a JavaScript onClick handler. Clicks like that show engagement and are worth tracking, but how? Let’s say you want to create a Google Analytics event every time a visitor clicks on an image with the ID: “Gallery_Image.” Here’s how you would do that in GTM V2 in four steps:
1. Add a page tracking tag. Choose a Google or Universal Analytics Tag Type and a “Page View” Track Type. Set the tag to fire on “All pages.”
2. Create a new trigger with the following parameters:
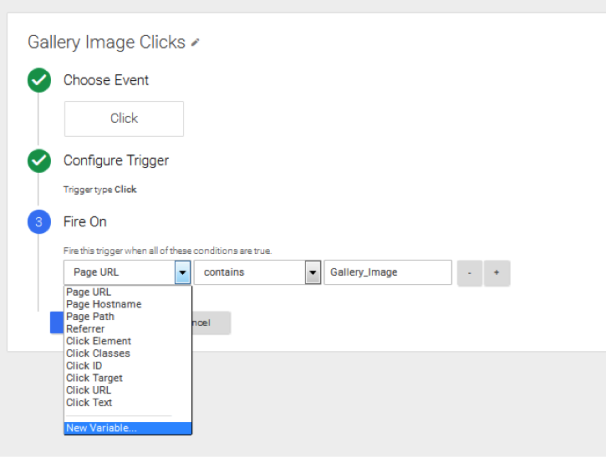
> Type: Click
> Filter: Element ID contains Gallery_Image (Note: your interface might not have “Element ID” as an option for the first field in the filter. If that’s the case, choose “New Variable” from that field’s drop-down menu as shown below.)
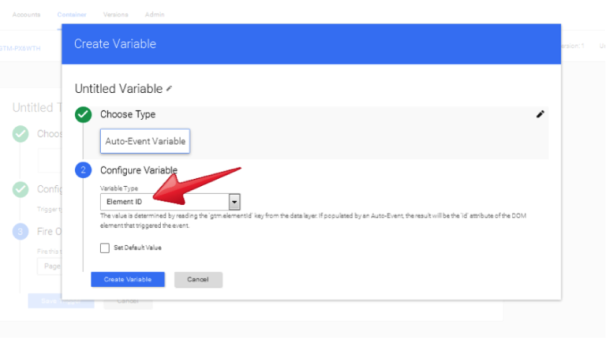
Once you click on “New Variable,” you’ll see a pop-up screen like the one below. Under “Choose Type,” select “Auto-Event Variable.” Under “Variable Type,” select “Element ID” and name the new variable.
Your trigger should look like this when you’re finished:
> Trigger Name: Gallery Image Clicks
> Trigger Type: All elements
NOTE: In GTM V2, creating a ‘Click’ trigger automatically activates GTM Auto-Event Listening when you publish your container.
3. Add an Analytics event tracking tag. Choose a Google or Universal Analytics Tag Type and an “Event” Track Type. Add the “Gallery Image Clicks” trigger you created in Step 2. Complete the “Category,” “Action,” and “Label” fields for the event. Try using the following:
> Category: “All”
> Action: “Click”
> Label: “All”
4. Save a version of your container, preview, debug, and publish.
Form submit tracking allows you to record every time a visitor submits a form on your site. You can set up triggers to fire a tag whenever a submit event takes place for any form on your site. Alternatively, you can customize your triggers to fire a tag only when a visitor submits a specific form. Say you have a form on your site that visitors can fill out for a free quote. We’ll name the form “My_Form.” Here’s how to track every submission of that form in GTM V2:
1. Add a page tracking tag. Choose a Google or Universal Analytics Tag Type and a “Page View” Track Type. Set the tag to fire on “All pages.”
2. Create a new trigger with the following parameters:
> Type: Form
> Enable When: To have the My Form Submit trigger listen for submit events on all pages, choose “Page URL matches RegEx .*” However, you may wish to customize this if “My_Form” can only be found on certain pages.
> Filter: Under “Fire On,” choose “Some Forms” and then enter: “Element ID contains My_Form”
> Trigger Name: My Form Submit
> Wait for Tags: Check (this will postpone the form submit until every dependent tag has fired or the max wait time has expired, whichever happens first)
> Max Wait Time: Appropriate time is up to you; we recommend 2000ms
3. Add an Analytics event tracking tag. Choose a Google or Universal Analytics Tag Type and an “Event” Track Type. Add the “My Form Submit” trigger you created in Step 2 by clicking “Form” under “Fire On” and selecting it from the pop-up menu. Complete the “Category,” “Action,” and “Label” fields as follows:
> Category: “Forms”
> Action: “Submit”
> Label: “Lead Gen”
Your screen should look like this when you’re finished:
4. Save a version of your container, preview, debug, and publish.
![]()
![]()