Complete Guide To

Complete Guide To

Best-case scenario, tagging snafus will result in missing or unreliable data. Worst-case scenario, bad tags will slow your pages down and possibly keep them from functioning at all. The result? People who might have left your site as customers instead leave as dissatisfied visitors. You’ve blown that critical first impression, all because of a pesky coding error.
In those scenarios, you will be able to fix the errors on your site, yes, but the damage that resulted from them is irreparable. The saying “You can’t put the [manure] back in the horse” springs to mind here. Because that maxim is as true in digital marketing as it is on the ranch, prevention is key with tagging. A little strategic risk management will spare your site from tagging debacles that would be the marketing version of the apocalypse.
We start Chapter 11 with a brief explanation of code injection, as it is the foundation of GTM. We’ll then give you tips on how to prevent tagging errors, including testing, setting user rules and regulations, and relying on template tags instead of custom HTML. This chapter also contains a step-by-step guide to previewing and debugging errors in GTM.

You probably have two questions right now: “What the $@#! is code injection?” and “Why should I care?” Code injection is the entire premise of tag management, and GTM could not work without it. It matters to you because this chapter is dedicated to ensuring GTM works properly. Before we get into that, we thought we’d briefly explain how and why GTM works in the first place.
Don’t panic, but code injection is also the driving force behind computer viruses. Hackers inject malicious scripts or HTML to a site’s code to wreak havoc. Malware can inject code to conceal itself, and computer worms can use code injection to propagate. Our point here is that code injection is a humdinger of a potent tool.
But you can also use code injection as a force for good. Injecting code means adding scripts or HTML to your site to enhance its functionality. Implementing GTM is an example of code injection — you insert the container snippet into your site’s source code. Those few lines of code give GTM permission to inject additional code, elements, and functions into your DOM. That code is how the tags and macros you create in GTM make their way to your site.
Now here’s the catch. Code injection is very unforgiving in that it runs any code in a custom HTML tag verbatim. GTM doesn’t have a safeguard in place to stop that code from tampering with content or global objects. GTM’s DOM API (application program interface) unlocks every element of the tree for modification, making it as easy to wreck something great as it is to build it. Given that fact, slacking on risk management and careful testing is a major no-no. The rest of the chapter will describe what checks you should have in place as a risk-averse GTM user.

Custom HTML tags are GTM’s Achilles’ heel – when things go really wrong, they are almost always to blame. Thankfully, there’s a safety net to the tight-rope walk that is custom tagging. You’ll write your custom HTML tags in Java Script, which you can surround with a try/catch exception-handling statement.
This just means that if there are errors in a tag, try/catch JavaScript will abort the execution of the rest of the code and suppress the error message a browser would normally send the user. Whenever a try statement runs into an error, it immediately passes control to the catch statement. The catch statement then captures any errors sent its way by the try statement and pushes them to the error object, which will tell you the details of the error. Your tracking code still won’t fire, but your site will continue to function properly with the user none the wiser.
If only one developer has access to GTM in your company, then you don’t need to worry about this. But for most of you, implementing and using GTM will be a multidepartment effort that involves more than one person. The more people you have with access to GTM, the messier things can get without clearly delineated rules, roles, and regulations. Set up a standard procedure for development so all involved know their responsibilities and access privileges with GTM.
As we mentioned in Chapter 4, even if GTM is a group effort, it’s important to assign ultimate responsibility and grant full access only to one or two people, preferably IT folks. Clear accountability will help you troubleshoot quickly, and your organization will have a go-to for GTM requests or questions. Well-defined roles will also help marketing understand the boundaries of their contributions to tagging. For instance, you might allow marketing folks to add tag templates to the site for review, but you would obviously want to keep them far away from the lethal custom HTML tag.
Say you’re the director of a Broadway musical. You wouldn’t dream of taking the show live without a dress rehearsal, or two, or three, would you? The test container follows the same logic – it allows you to see how your tags fire before publishing changes to your site.
GTM’s test container is Broadway’s dress rehearsal. Any time you introduce changes in GTM, you can create and save a new container in the staging environment before you go live. By creating containers, you also have a Plan B if the latest version doesn’t work live; you can always revert back to a previous iteration.
Testing is where you catch problems before they sabotage your tracking efforts. GTM allows you to test your changes several times in staging and development environments. We’ll explain how to test in the next section, but for now we’ll just define two important GTM modes: preview and debug. Debug mode will tell you which tags are firing and which are not. In preview mode you can see how your site will look with the new container draft, but only in your browser. This mode will help you see whether any tags are affecting your site’s functionality.

A thorough previewing and debugging process will help you avoid the risk of compromising your live site with tagging issues. You’ll get to see your site with your changes as if they were deployed. GTM sends your browser a special cookie that allows you to preview without changing your actual site. Here are the steps you’ll need to take before publishing.
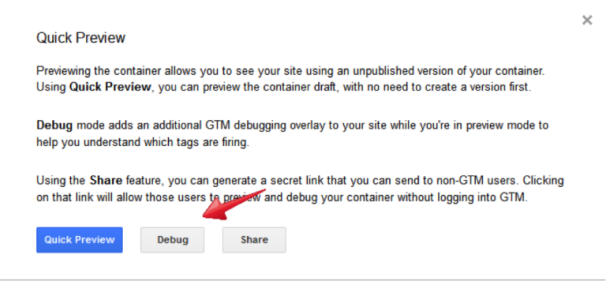
1. Enable preview and debug mode. Once you have your container ready to go, click on the “Preview” button at the top right of the “Container Draft: Overview” screen in GTM V1. When you do, you’ll see a pop-up screen like the one below. To better understand which tags are and are not working, choose the “Debug” option. This adds GTM’s debugging overlay to your site.
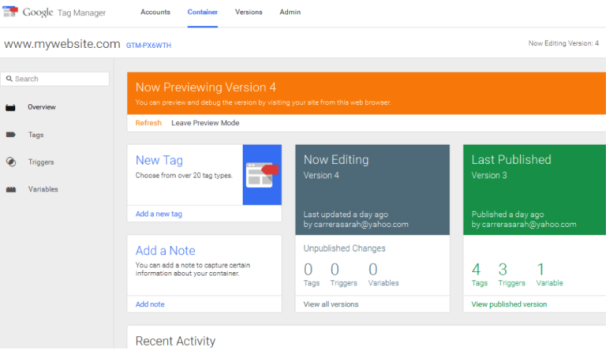
In GTM V2, while in the “Containers” tab, you’ll go to the “Publish” drop-down menu at the top right of the screen and choose “Preview.” GTM V2’s preview mode includes debugging mode by default. Once you enter preview mode, you will see this screen:
2. Visit your website. When you arrive at your site, you’ll see a console window at the bottom of your browser window with all sorts of tagging information, including what data each tag is processing and the tag’s firing status. No one will be able to see these details but you.
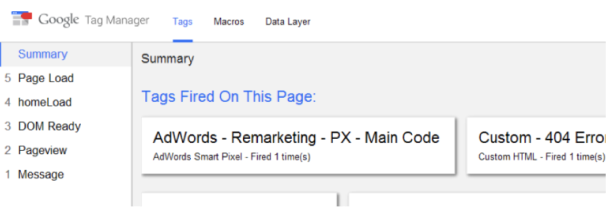
GTM Version 1 had a bare-bones debug panel that only told you basic information about your tags’ state of affairs. GTM V2 has made the old interface look as sophisticated as the original iPhone next to the 6 Plus. In addition to having all the info displayed by GTM V1, GTM V2’s debug panel displays a chronological list of the last five events pushed to the data layer in the left-hand column (see screenshot below). Choosing any one of these events lets you see a summary of your container’s state for that specific event.
3. Review the summary option in the Tags, Variables/Macros, and Data Layer tabs for errors. Click on each event in the left column and review the state of tags, variables/macros, and the data layer using the tabs at the top of the page. The “Tags” tab will tell you the tag’s properties as well as its firing and blocking triggers (rules in GTM V1). GTM separates the tags according to whether they fired for that event or not.
In the “Variables” tab, you’ll see the details of variables (macros in GTM V1) in the chosen event, including the kind of variable, the resolved value, and the type of information returned.
In the “Data Layer” tab, you’ll see the message object verbatim as it was pushed to the data layer for the chosen event as well as what the data layer will look like once the message transaction is finished.
4. Leave Preview Mode and create a new container version. Once you’ve worked out all the kinks from your tags, exit preview mode by hitting “exit” at the top of the page in GTM V1 or “Leave Preview Mode” in the orange box at the top of the page in GTM V2. Create a new container version with your changes.
5. Share Preview Link with QA for review. Now it’s time to run your new container by IT or management for the green light before you go live. QA will perform their own test of the version, and, if it looks good, they will either publish it or give you the go-ahead to do so on your own.
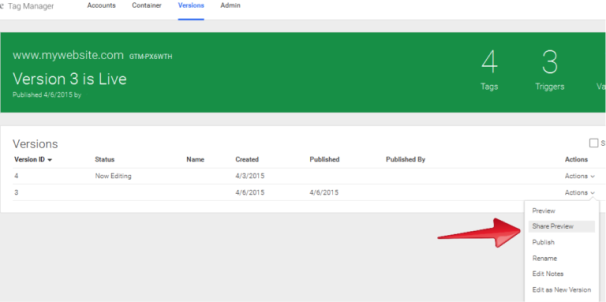
In GTM V1 you’ll select “Share” from the Preview Mode pop-up box. In GTM V2 you’ll select “Share Preview” from the “Actions” drop-down menu in the “Containers” tab as pictured below.
6. Test live, and revert to last functional version if problems arise. If you take your changes live and all seems well, your work is done. If things go south, you can always use GTM to revert to your previous container version until you can troubleshoot the new one. Simply go into GTM and hit “Publish” for the last working container version you had.
![]()
![]()
Best-case scenario, tagging snafus will result in missing or unreliable data. Worst-case scenario, bad tags will slow your pages down and possibly keep them from functioning at all. The result? People who might have left your site as customers instead leave as dissatisfied visitors. You’ve blown that critical first impression, all because of a pesky coding error.
In those scenarios, you will be able to fix the errors on your site, yes, but the damage that resulted from them is irreparable. The saying “You can’t put the [manure] back in the horse” springs to mind here. Because that maxim is as true in digital marketing as it is on the ranch, prevention is key with tagging. A little strategic risk management will spare your site from tagging debacles that would be the marketing version of the apocalypse.
We start Chapter 11 with a brief explanation of code injection, as it is the foundation of GTM. We’ll then give you tips on how to prevent tagging errors, including testing, setting user rules and regulations, and relying on template tags instead of custom HTML. This chapter also contains a step-by-step guide to previewing and debugging errors in GTM.
You probably have two questions right now: “What the $@#! is code injection?” and “Why should I care?” Code injection is the entire premise of tag management, and GTM could not work without it. It matters to you because this chapter is dedicated to ensuring GTM works properly. Before we get into that, we thought we’d briefly explain how and why GTM works in the first place.
Don’t panic, but code injection is also the driving force behind computer viruses. Hackers inject malicious scripts or HTML to a site’s code to wreak havoc. Malware can inject code to conceal itself, and computer worms can use code injection to propagate. Our point here is that code injection is a humdinger of a potent tool.
But you can also use code injection as a force for good. Injecting code means adding scripts or HTML to your site to enhance its functionality. Implementing GTM is an example of code injection — you insert the container snippet into your site’s source code. Those few lines of code give GTM permission to inject additional code, elements, and functions into your DOM. That code is how the tags and macros you create in GTM make their way to your site.
Now here’s the catch. Code injection is very unforgiving in that it runs any code in a custom HTML tag verbatim. GTM doesn’t have a safeguard in place to stop that code from tampering with content or global objects. GTM’s DOM API (application program interface) unlocks every element of the tree for modification, making it as easy to wreck something great as it is to build it. Given that fact, slacking on risk management and careful testing is a major no-no. The rest of the chapter will describe what checks you should have in place as a risk-averse GTM user.
Custom HTML tags are GTM’s Achilles’ heel – when things go really wrong, they are almost always to blame. Thankfully, there’s a safety net to the tight-rope walk that is custom tagging. You’ll write your custom HTML tags in Java Script, which you can surround with a try/catch exception-handling statement.
This just means that if there are errors in a tag, try/catch JavaScript will abort the execution of the rest of the code and suppress the error message a browser would normally send the user. Whenever a try statement runs into an error, it immediately passes control to the catch statement. The catch statement then captures any errors sent its way by the try statement and pushes them to the error object, which will tell you the details of the error. Your tracking code still won’t fire, but your site will continue to function properly with the user none the wiser.
If only one developer has access to GTM in your company, then you don’t need to worry about this. But for most of you, implementing and using GTM will be a multidepartment effort that involves more than one person. The more people you have with access to GTM, the messier things can get without clearly delineated rules, roles, and regulations. Set up a standard procedure for development so all involved know their responsibilities and access privileges with GTM.
As we mentioned in Chapter 4, even if GTM is a group effort, it’s important to assign ultimate responsibility and grant full access only to one or two people, preferably IT folks. Clear accountability will help you troubleshoot quickly, and your organization will have a go-to for GTM requests or questions. Well-defined roles will also help marketing understand the boundaries of their contributions to tagging. For instance, you might allow marketing folks to add tag templates to the site for review, but you would obviously want to keep them far away from the lethal custom HTML tag.
Say you’re the director of a Broadway musical. You wouldn’t dream of taking the show live without a dress rehearsal, or two, or three, would you? The test container follows the same logic – it allows you to see how your tags fire before publishing changes to your site.
GTM’s test container is Broadway’s dress rehearsal. Any time you introduce changes in GTM, you can create and save a new container in the staging environment before you go live. By creating containers, you also have a Plan B if the latest version doesn’t work live; you can always revert back to a previous iteration.
Testing is where you catch problems before they sabotage your tracking efforts. GTM allows you to test your changes several times in staging and development environments. We’ll explain how to test in the next section, but for now we’ll just define two important GTM modes: preview and debug. Debug mode will tell you which tags are firing and which are not. In preview mode you can see how your site will look with the new container draft, but only in your browser. This mode will help you see whether any tags are affecting your site’s functionality.
A thorough previewing and debugging process will help you avoid the risk of compromising your live site with tagging issues. You’ll get to see your site with your changes as if they were deployed. GTM sends your browser a special cookie that allows you to preview without changing your actual site. Here are the steps you’ll need to take before publishing.
1. Enable preview and debug mode. Once you have your container ready to go, click on the “Preview” button at the top right of the “Container Draft: Overview” screen in GTM V1. When you do, you’ll see a pop-up screen like the one below. To better understand which tags are and are not working, choose the “Debug” option. This adds GTM’s debugging overlay to your site.
In GTM V2, while in the “Containers” tab, you’ll go to the “Publish” drop-down menu at the top right of the screen and choose “Preview.” GTM V2’s preview mode includes debugging mode by default. Once you enter preview mode, you will see this screen:
2. Visit your website. When you arrive at your site, you’ll see a console window at the bottom of your browser window with all sorts of tagging information, including what data each tag is processing and the tag’s firing status. No one will be able to see these details but you.
GTM Version 1 had a bare-bones debug panel that only told you basic information about your tags’ state of affairs. GTM V2 has made the old interface look as sophisticated as the original iPhone next to the 6 Plus. In addition to having all the info displayed by GTM V1, GTM V2’s debug panel displays a chronological list of the last five events pushed to the data layer in the left-hand column (see screenshot below). Choosing any one of these events lets you see a summary of your container’s state for that specific event.
3. Review the summary option in the Tags, Variables/Macros, and Data Layer tabs for errors. Click on each event in the left column and review the state of tags, variables/macros, and the data layer using the tabs at the top of the page. The “Tags” tab will tell you the tag’s properties as well as its firing and blocking triggers (rules in GTM V1). GTM separates the tags according to whether they fired for that event or not.
In the “Variables” tab, you’ll see the details of variables (macros in GTM V1) in the chosen event, including the kind of variable, the resolved value, and the type of information returned.
In the “Data Layer” tab, you’ll see the message object verbatim as it was pushed to the data layer for the chosen event as well as what the data layer will look like once the message transaction is finished.
4. Leave Preview Mode and create a new container version. Once you’ve worked out all the kinks from your tags, exit preview mode by hitting “exit” at the top of the page in GTM V1 or “Leave Preview Mode” in the orange box at the top of the page in GTM V2. Create a new container version with your changes.
5. Share Preview Link with QA for review. Now it’s time to run your new container by IT or management for the green light before you go live. QA will perform their own test of the version, and, if it looks good, they will either publish it or give you the go-ahead to do so on your own.
In GTM V1 you’ll select “Share” from the Preview Mode pop-up box. In GTM V2 you’ll select “Share Preview” from the “Actions” drop-down menu in the “Containers” tab as pictured below.
6. Test live, and revert to last functional version if problems arise. If you take your changes live and all seems well, your work is done. If things go south, you can always use GTM to revert to your previous container version until you can troubleshoot the new one. Simply go into GTM and hit “Publish” for the last working container version you had.
![]()
![]()