MACHINE LEARNING FOR MARKETERS
A Comprehensive Guide to Machine Learning
In Chapter 6, we discussed the basics of chatbots and how they are important to the growth of Machine Learning. Now, we’ll dive into the nuts and bolts of how you can set up a chatbot yourself. We briefly touched on the overall structure and components of a chatbot, as well as some of the third-party tools that exist to create chatbots, but we want to dive deeper into the concept and give you a strong idea of exactly how you can put down this guide and get to building your first chatbot.
Creating a Facebook chatbot from scratch isn’t extremely difficult, but the process can be a technical one. Below, we present two versions of this process: one for individuals who don’t have a high degree of coding knowledge and one for those readers who are more technically proficient.
For those of you who don’t have a technical background or access to a developer, Chatfuel may be the answer for you.
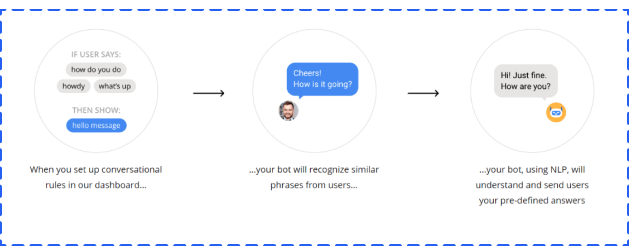
Backed by Yandex, Russian entrepreneurs Dmitrii Dumik and Artem Ptashnik founded . Chatfuel in 2015. Chatfuel builds chatbots on the Facebook Messenger platform. Users can train their own bots in the Chatfuel system. Natural Language Processing (NLP) in the system allows training information from the user to be applied to a larger web of related terms and phrases.
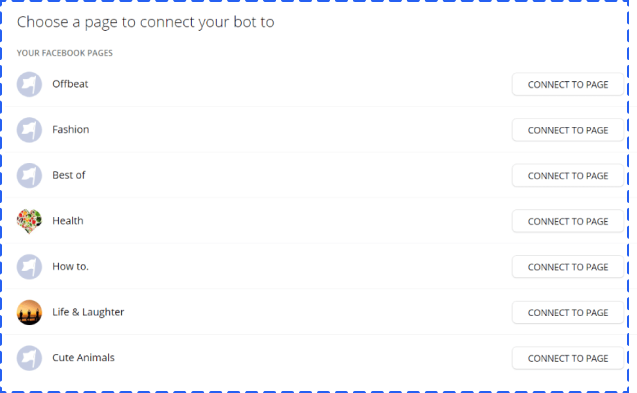
Chatfuel walks you through the same process that developers use as they code their applications. Once you sign up via your Facebook account, you’ll choose a page that you want to associate with your application. You may need to create a page if you intend to test your application before launching it.
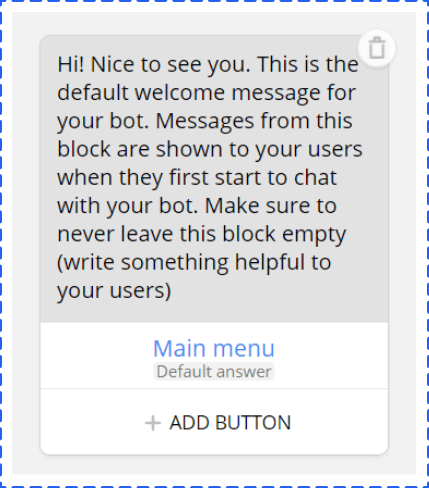
The first and most basic setup for the Chatfuel bots is to create and link “blocks.” Blocks are essentially messages sent to users. For example, below is a “welcome” block in the back end of the system:
And what follows is how the block looks in Messenger.
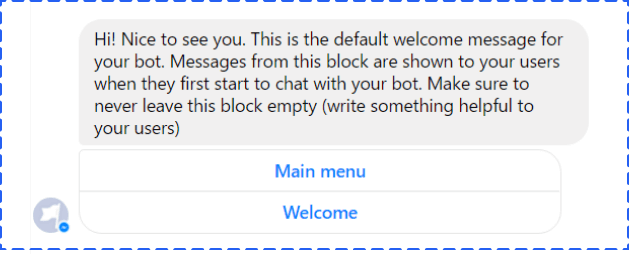
The “link” here is the “Main Menu” button. When you press it, Chatfuel gives you the following:

You’ll remember that this choose-your-own-adventure style of logic is similar to some of the functionality CNN built into its Kik-based news bot.
You’ll get the most value from using the Chatfuel-integrated AI. This section of Chatfuel is the place where you’ll train your chatbot how to handle questions. You can respond with basic text, images, video, and other options.

Chatfuel offers a payments option that makes conversational commerce an option for bot builders.
The first step in creating your own Facebook chatbot through development is to create a working endpoint that delivers a 200 response code. Put simply, this step lets you talk directly with Facebook. Hartley Brody does a great job walking you through this step with a Github project to help you every step of the way with code. To execute this process, you’ll need Heroku, which is basically a cloud platform that allows companies to essentially become their own app companies by producing, sharing, tracking, and scaling their apps. Heroku offers app developers the advantage of avoiding complicated infrastructure hardware or scaled servers.
You’ll see that this is the second basic step to create your chatbot through third-party applications as well. You can use a Facebook page you currently have or begin a new page, but think of this page as the identity of your bot. It’ll be the group of people you can broadcast your bot to, and it’ll be the entity with whom your users will interact. Be careful with your choice and testing.
If you don’t already have one, you need to create a Facebook page. The Facebook Page is the “identity” of your bot, including the name and image that appears when someone chats with it inside Facebook Messenger.
If you’re creating a dummy one for your chatbot, it doesn’t matter what you name it or how you categorize it. You can skip through most of the setup steps.
In order to communicate with your bot, people will need to go through your page, which we’ll look at in a bit.
Now you are ready to create a Facebook App for your bot. You’ll need to name your bot, categorize it, and give it some other basic info.
After you’ve created your App ID, you’ll have the option of selecting the product you want when setting up your app. You’ll choose Messenger, which serves as the platform for your chatbot.
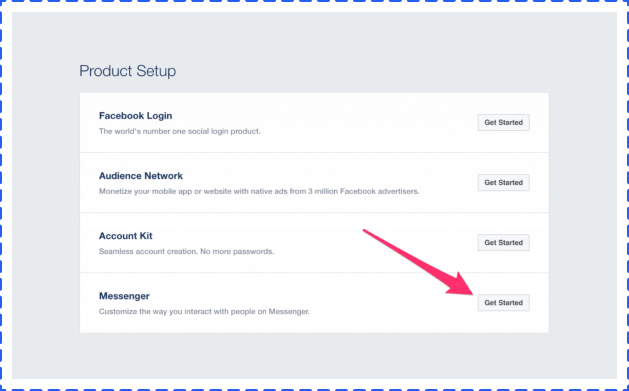
Set Up The Messenger Application
All of the steps below need to happen in Facebook before you get into the code portion of your chatbot.
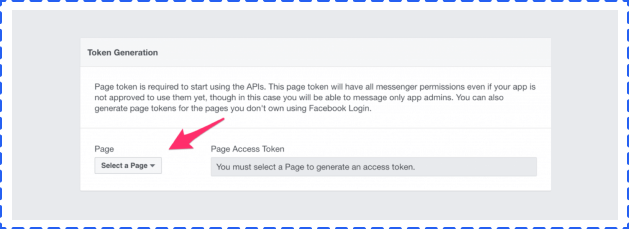
1. Create a Page Access Token by clicking through the authentication flow (see below). You’ll use this token to authenticate your requests when you try to send a message or reply to someone.
2. You’ll then need to create a webhook. Facebook will ask you for a callback URL, verification token, and subscription hooks.
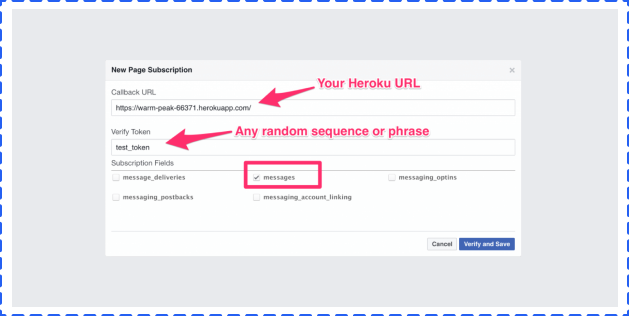
3. After you’ve configured your webhook, you’ll need to subscribe to the specific page for which you want to receive message notifications.
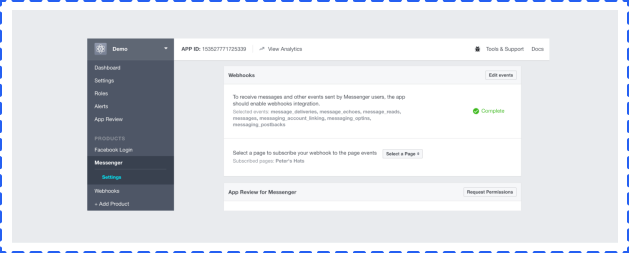
Start sending yourself messages through your newly connected application. Go to the Facebook page, and under the options button next to “Share,” select “View Page as Visitor.”
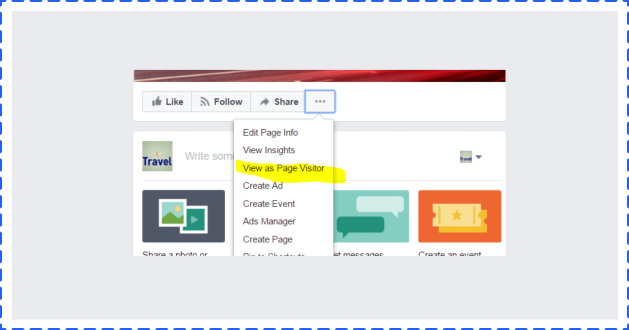
This selection will allow you to message the page as a visitor.
Most developers use Heroku when building Facebook apps because Heroku allows developers to work with the language that’s most natural for them to use when coding.
Beyond Hartley Brody’s framework, you’ll find a few others worth noting that may help you or your developers with some plug-and-play code to get your chatbot talking.
• Messenger Bot Tutorial
• Charca bootbot
• Facebook Chat bot with Node and Heroku
One commonality you’ll notice is the way these chatbots work: They classify anticipated user questions or keywords and match them with responses.
Before Facebook verifies your application, only you and your page admins can test or launch the chatbot you’re creating. Facebook has to review all apps, but chatbots are especially large security risks. The capabilities to spoof human behavior, send malicious links, and use processes to retrieve private data are too real with this technology.
While you’re testing your bot, only you and other page admins can message the bot directly. You’ll have to go through a review process before your bot is open to the world, ready to chat with anyone.
Facebook seems to be quite thorough in its review process, and with good reason. The code for a messaging bot runs on your own servers and could change at any time, without Facebook knowing it’s changing.
As long as your application is a legitimate chatbot set up to enrich the user experience of people who like your page, you shouldn’t have any issues.
Similar to Chatfuel, Botsify allows you to build a chatbot on Facebook Messenger free. It also offers a paid version of its system to create a chatbot for a website. One of the interesting parts that’s special about Botsify is the ability for bot builders to use what it calls “stories.
Stories are essentially user stories, but they also serve as the real training data for the bot. The creator builds out an entire possible interaction or series of interactions, with phrase and response alternatives. Within these stories, you’re able to connect outside APIs to bring data into the chatbot. These features are the right mix of user friendliness to allow anyone to build a bot, while also allowing for the maximum amount of customization.
Like Chatfuel, Botsify permits template linking similar to the CNN use case. These links allow information to easily be tied to various communications between bot and user.
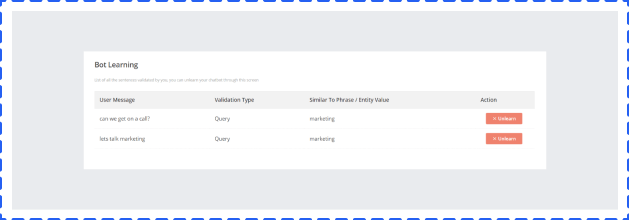
The Converse and Learning tools in Botisfy bring the AI capabilities of this system to a new level. In this window, you’re able to “teach” your bot based on real conversations within the application that it wasn’t able to answer.
The templates section of the Botsify application will make marketers swoon. These templates feature various ways to maximize interaction with chatbot users.
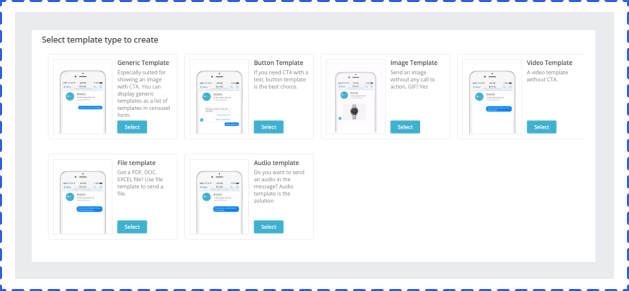
With templates, you can allow various messages to be tied directly into product options that link to purchase opportunities.
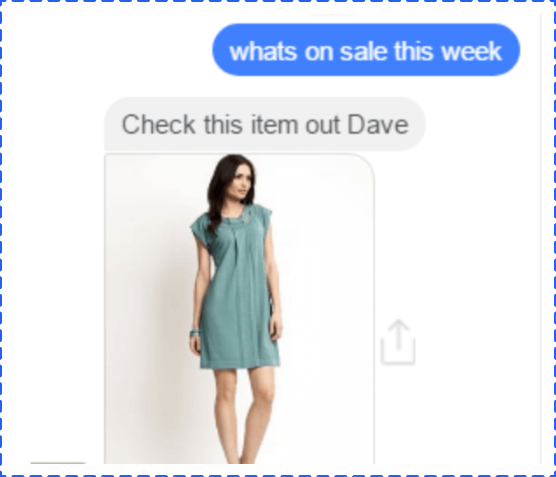
Dialogflow, became part of Google Cloud Platform in 2017, is another third-party tool that permits chatbot creation. Dialogflow is able to build conversational interfaces with a number of applications and devices.
Below, you’ll find the way Dialogflow layers into the chatbot development process.
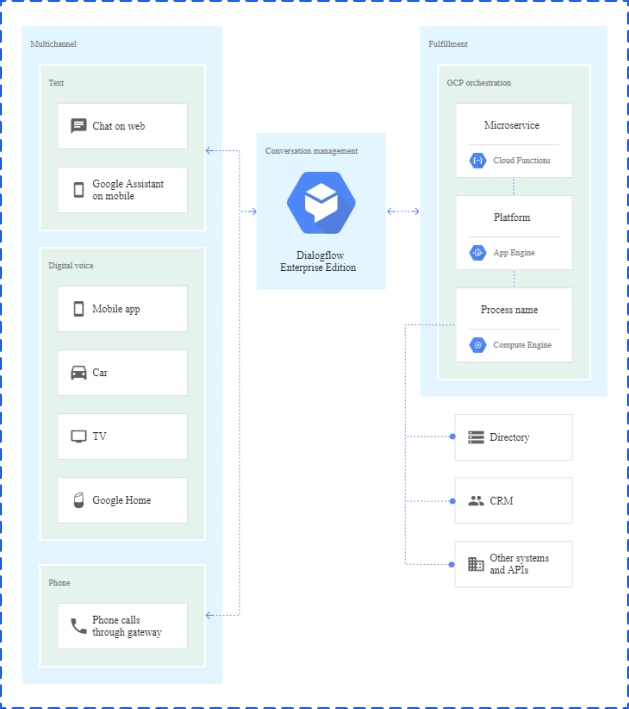
The system architecture has the following components: (reference link: https://cloud.google.com/solutions/building-and-deploying-chatbotdialogflow)
• Multichannel integration: Any conversational interface connects with multiple channels, which can be in both voice and text format.
• Conversation management: This component is the heart of interface and typically provides the following functionality:
• Speech-to-Text (STT) and Text-to-Speech (TTS): Conversation interfaces have the ability to interact with speech and text.
• Virtual agent: Agents are responsible for managing the flow of the conversation based on the intent or motivation extracted from user conversation. A good conversation interface has an agent system that can handle linear and nonlinear conversations.
• Fulfillment interface: No conversation interface system is complete without a robust fulfillment interface, which is required to connect virtual agents to external systems. This interface is required to connect with external systems to fetch dynamic information to continue or fulfill a conversation.
MobileMonkey is a multi-platform chatbot builder, as well as the only platform that allows businesses to make Facebook ad bots, SMS bots, and native webchat bots in one place.
Additionally, the platform is extremely intuitive and does not require any coding knowledge.
Building a chatbot for your business with MobileMonkey To build a bot for your business, do the following:
• Decide what the bot will do for your business
• Navigate to the MobileMonkey bot builder.
• Select “Chatbots” from the sidebar.
• Select “Dialogues” to start building your bot.
• Add your dialogue options.
• Add your Q+A triggers.
• Test your bot!
Now, the #1 chat app in the U.S. is Facebook Messenger, and automated Messenger marketing has all-star engagement, beating engagement of Facebook Newsfeed, ads, and email marketing by 10X and more.
So for this example, here’s how you can build a Facebook Messenger chatbot in just 15 minutes using MobileMonkey.
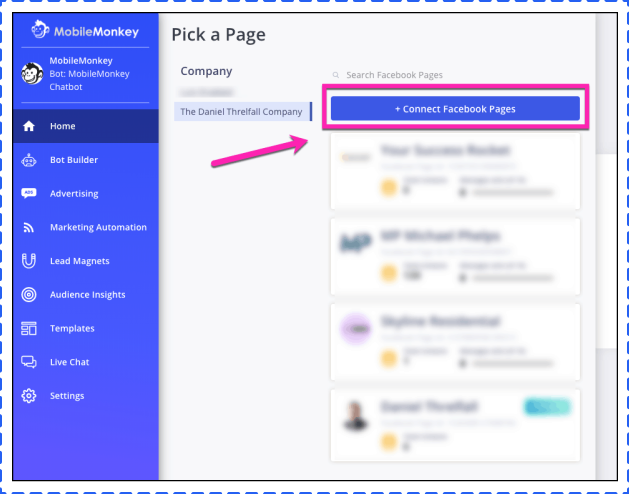
From the menu, select any Facebook pages you want to connect to your chatbot platform, then click “Connect Facebook Pages.”
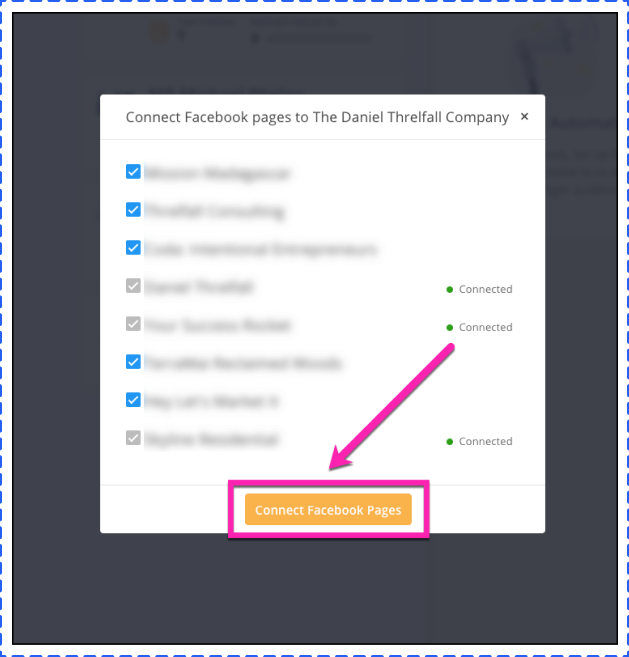
That’s all that is required to connect your Facebook page to your chatbot builder.
Select the Facebook page where you want to build a chatbot
If you’re only working on one Facebook page, then things are kind of simple.
As it is, all you need to do in this step is to click on the Facebook page where you’re making a chatbot.
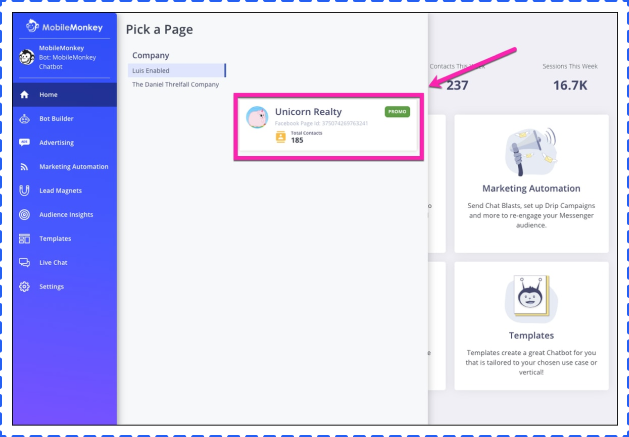
In this example, we’ll be making a chatbot for a fictional real estate company, Unicorn Realty.
Once you click on the correct page, you’ll enter MobileMonkey’s main interface, which features the main menu, and includes access to everything you see in the screenshot below.
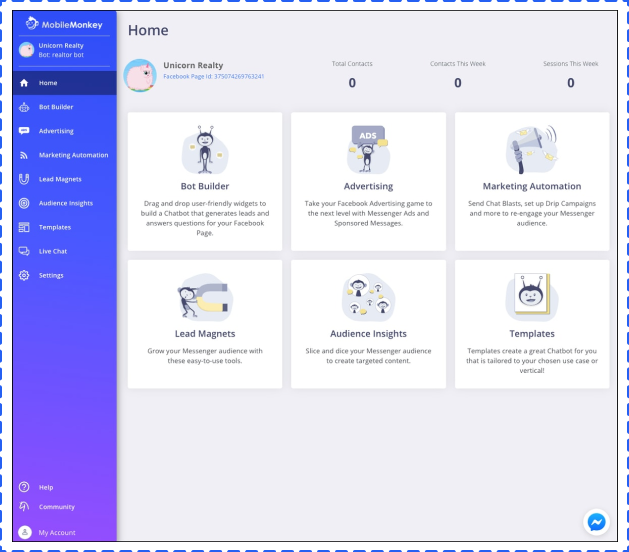
There’s a lot you can do here, but we’re going to dive straight into the Bot Builder.
Open up the Bot Builder.
When you start making chatbots, you’ll be spending a lot of time in the chatbot builder.
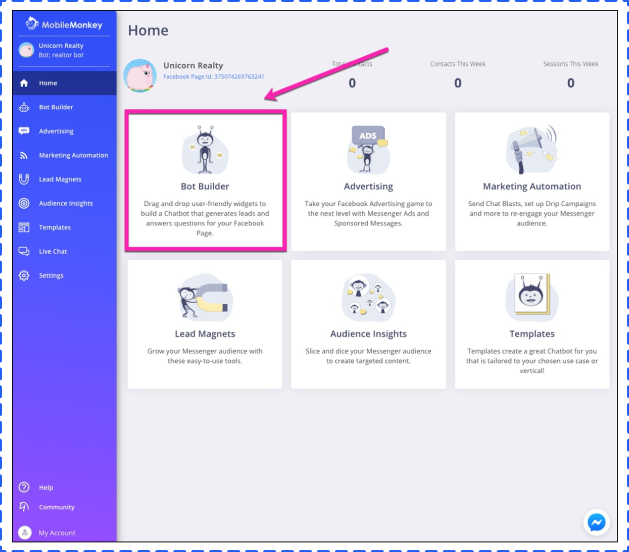
There are two options when opening the bot builder — dialogues and Q&A.
Dialogues are the heart and soul of chatbots — asking questions, providing options, delivering content. Basically, anything that a chatbot does.
Q&A involves a method of teaching your chatbot what to do when faced with certain keywords.
For example, if a customer is interacting with your chatbot and mentions price or cost, you can program your chatbot to respond with pricing information.
To use the Q&A feature, you’ll have to create dialogues that are triggered based on certain keywords.
So, we’re going to work on dialogues (not Q&As for this example).
Open the Dialogue Bot Builder
When you open the Bot Builder for the first time, you’ll see a pre-built Welcome Dialogue.
At this point, you’ll want to do a bit more to customize things and make this chatbot your very own.
Let’s take a look at the dialogue builder to see what’s what.
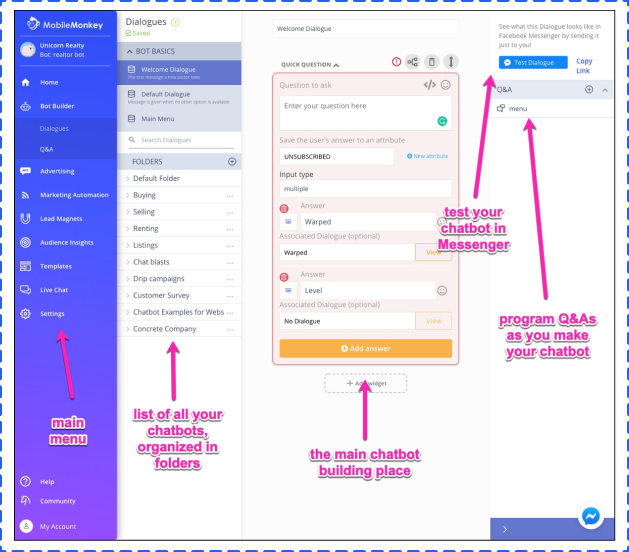
Add a Quick Question Widget.
Widgets are the chatbot building blocks. To create a chatbot dialogue, you’ll have to add widgets.
MobileMonkey has more than fifteen widgets, such as:
• Text
• Attachments
• Forms
• Images
• Lists
• GIFs, and
• Emails
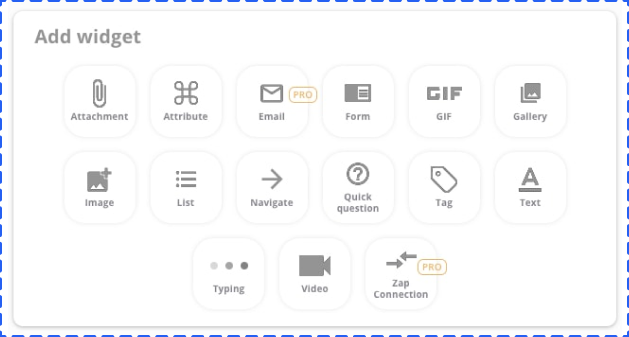
One of the most versatile widgets is the quick question widget.
Click the Quick Question button to add it.
Add your quick question with an attribute
Since we’re creating a Welcome Dialogue, the question is intended to draw the user into a conversation.
Type your question and add an attribute. Attributes are things that the bot builder will automatically add based on what it knows about the user.
This includes things like the user’s name, gender, time zone, etc.
It’s a good idea to personalize your chatbot by including something like the user’s first name.
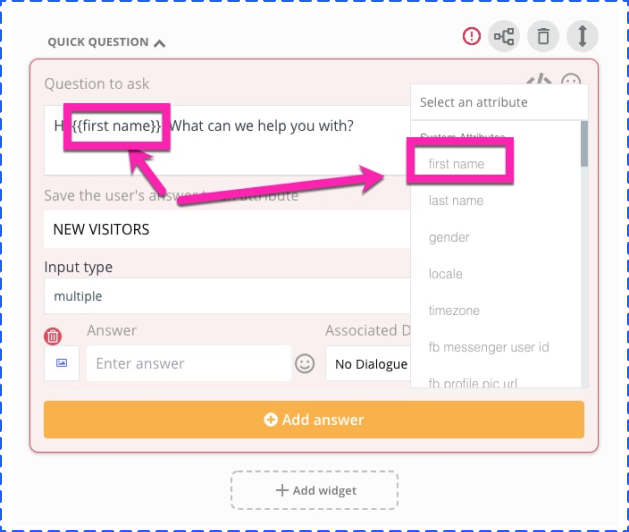
Save the user’s answer by creating a new attribute
One thing you’ll almost always want to do is save the user’s answer(s) by creating a new attribute. MobileMonkey will automatically save a list of these answers.
Set up a new attribute by clicking the new attribute button and naming it.
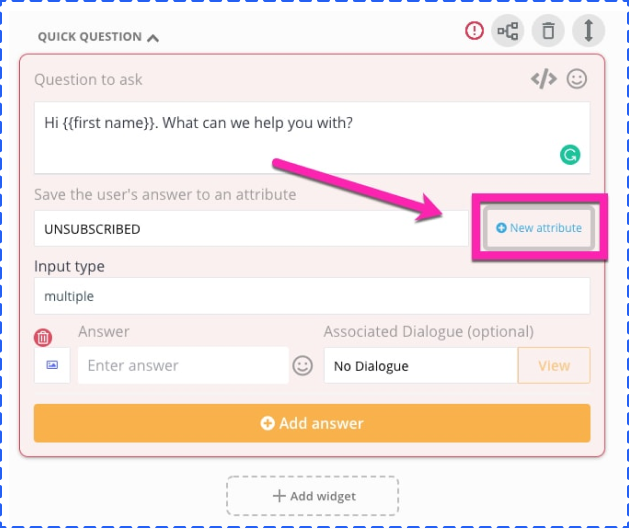
Add an input type for the user’s answer
You have five choices:
1. Multiple choice – The user selects their answer from options that you create
2. Free form text – The user can type whatever they want to
3. Location – The user can send their location with a single tap
4. Email – The chatbot automatically populates the answer with the user’s email and they tap to send it.
5. Phone – The user can provide their phone number with a quick tap
For this example, we’re going to use multiple choice. Multiple choice can include just a single choice or as many as you want. To answer the quick question, users will tap or click the response.
Create multiple choice answers
Click “Add Answer” to start creating the answer to the multiple-choice question.
From here, you can do things like adding images to your answers. It just makes it look more interesting.
Click the small image icon to the left of the answer box, and you can select an image file from your computer.
Type in your answer, and create as many choices as you want to.
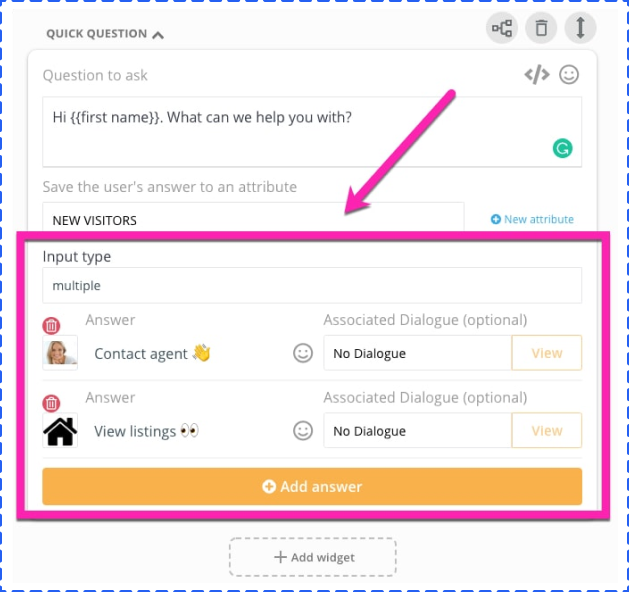
Now that we’ve created a couple of answers, it’s important to discuss where we’re going with this.
Each answer is going to lead to something else. That something else is another dialogue.
Essentially, what you’re doing is creating a branching menu, where one option opens another conversation or dialogue.
What to do from here:
We’ve practically created your first MobileMonkey bot at this point. However, there’s plenty of options to continue your engagement with the audience in the present, and in the future.
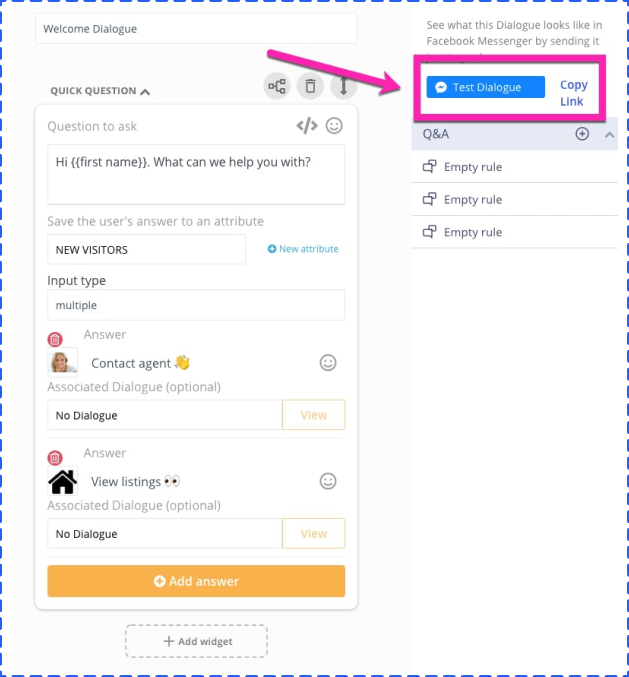
One thing you’ll definitely want to do is test your chatbot periodically and see how it’s performing.
Do this by clicking the “Test Dialogue” button in the upper right corner.
How to Create a Chatbot and Beyond:
Here’s what you need to know about creating chatbots.
This is just the beginning.
There are dozens of chatbot tools, a website chatbot widget, SMS, webchat, Facebook Messenger ads creator, Messenger automation tools, customer service tools, list building tools, and tens of thousands of integrations.
There’s a lot of potential and success stories to be made once you dive in.
If you want to discover more of the potential of chatbots, try out the MobileMonkey chatbot templates library (mobilemonkey.com/chatbots/ facebook-messenger-templates).
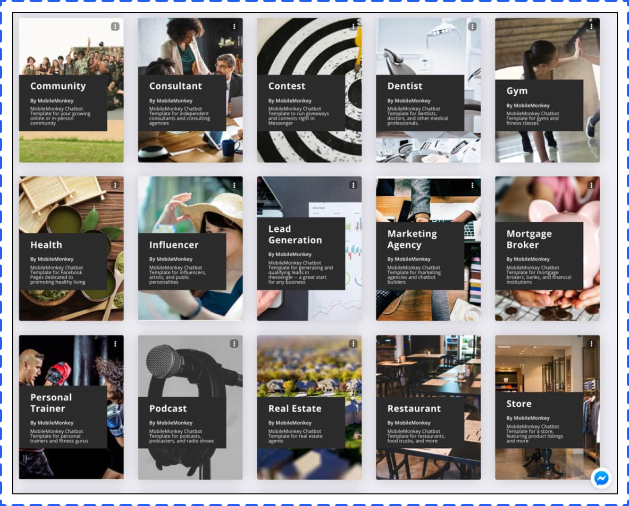
MobileMonkey has a collection of pre-made templates (100% free) that will take that fifteen minutes of chatbot creation time and shrink it down to five. For more information about chatbots visit chatbots.org!
We’ve covered the subject of creating your own chatbot in quite some detail in this chapter, and we offered you some examples of several tools to consider when developing a chatbot on your own. In the next chapter, we’ll move beyond chatbots a bit and get you on the path to putting Machine Learning to work for you in your marketing efforts.
In Chapter 6, we discussed the basics of chatbots and how they are important to the growth of Machine Learning. Now, we’ll dive into the nuts and bolts of how you can set up a chatbot yourself. We briefly touched on the overall structure and components of a chatbot, as well as some of the third-party tools that exist to create chatbots, but we want to dive deeper into the concept and give you a strong idea of exactly how you can put down this guide and get to building your first chatbot.

Creating a Facebook chatbot from scratch isn’t extremely difficult, but the process can be a technical one. Below, we present two versions of this process: one for individuals who don’t have a high degree of coding knowledge and one for those readers who are more technically proficient.
For those of you who don’t have a technical background or access to a developer, Chatfuel may be the answer for you.
Backed by Yandex, Russian entrepreneurs Dmitrii Dumik and Artem Ptashnik founded . Chatfuel in 2015. Chatfuel builds chatbots on the Facebook Messenger platform. Users can train their own bots in the Chatfuel system. Natural Language Processing (NLP) in the system allows training information from the user to be applied to a larger web of related terms and phrases.

Chatfuel walks you through the same process that developers use as they code their applications. Once you sign up via your Facebook account, you’ll choose a page that you want to associate with your application. You may need to create a page if you intend to test your application before launching it.

The first and most basic setup for the Chatfuel bots is to create and link “blocks.” Blocks are essentially messages sent to users. For example, below is a “welcome” block in the back end of the system:

And what follows is how the block looks in Messenger.

The “link” here is the “Main Menu” button. When you press it, Chatfuel gives you the following:

You’ll remember that this choose-your-own-adventure style of logic is similar to some of the functionality CNN built into its Kik-based news bot.
You’ll get the most value from using the Chatfuel-integrated AI. This section of Chatfuel is the place where you’ll train your chatbot how to handle questions. You can respond with basic text, images, video, and other options.

Chatfuel offers a payments option that makes conversational commerce an option for bot builders.
The first step in creating your own Facebook chatbot through development is to create a working endpoint that delivers a 200 response code. Put simply, this step lets you talk directly with Facebook. Hartley Brody does a great job walking you through this step with a Github project to help you every step of the way with code. To execute this process, you’ll need Heroku, which is basically a cloud platform that allows companies to essentially become their own app companies by producing, sharing, tracking, and scaling their apps. Heroku offers app developers the advantage of avoiding complicated infrastructure hardware or scaled servers.
You’ll see that this is the second basic step to create your chatbot through third-party applications as well. You can use a Facebook page you currently have or begin a new page, but think of this page as the identity of your bot. It’ll be the group of people you can broadcast your bot to, and it’ll be the entity with whom your users will interact. Be careful with your choice and testing.
If you don’t already have one, you need to create a Facebook page. The Facebook Page is the “identity” of your bot, including the name and image that appears when someone chats with it inside Facebook Messenger.
If you’re creating a dummy one for your chatbot, it doesn’t matter what you name it or how you categorize it. You can skip through most of the setup steps.
In order to communicate with your bot, people will need to go through your page, which we’ll look at in a bit.
Now you are ready to create a Facebook App for your bot. You’ll need to name your bot, categorize it, and give it some other basic info.
After you’ve created your App ID, you’ll have the option of selecting the product you want when setting up your app. You’ll choose Messenger, which serves as the platform for your chatbot.

Set Up The Messenger Application
All of the steps below need to happen in Facebook before you get into the code portion of your chatbot.
1. Create a Page Access Token by clicking through the authentication flow (see below). You’ll use this token to authenticate your requests when you try to send a message or reply to someone.

2. You’ll then need to create a webhook. Facebook will ask you for a callback URL, verification token, and subscription hooks.

3. After you’ve configured your webhook, you’ll need to subscribe to the specific page for which you want to receive message notifications.

Start sending yourself messages through your newly connected application. Go to the Facebook page, and under the options button next to “Share,” select “View Page as Visitor.”

This selection will allow you to message the page as a visitor.
Most developers use Heroku when building Facebook apps because Heroku allows developers to work with the language that’s most natural for them to use when coding.
Beyond Hartley Brody’s framework, you’ll find a few others worth noting that may help you or your developers with some plug-and-play code to get your chatbot talking.
• Messenger Bot Tutorial
• Charca bootbot
• Facebook Chat bot with Node and Heroku
One commonality you’ll notice is the way these chatbots work: They classify anticipated user questions or keywords and match them with responses.
Before Facebook verifies your application, only you and your page admins can test or launch the chatbot you’re creating. Facebook has to review all apps, but chatbots are especially large security risks. The capabilities to spoof human behavior, send malicious links, and use processes to retrieve private data are too real with this technology.
While you’re testing your bot, only you and other page admins can message the bot directly. You’ll have to go through a review process before your bot is open to the world, ready to chat with anyone.
Facebook seems to be quite thorough in its review process, and with good reason. The code for a messaging bot runs on your own servers and could change at any time, without Facebook knowing it’s changing.
As long as your application is a legitimate chatbot set up to enrich the user experience of people who like your page, you shouldn’t have any issues.
Similar to Chatfuel, Botsify allows you to build a chatbot on Facebook Messenger free. It also offers a paid version of its system to create a chatbot for a website. One of the interesting parts that’s special about Botsify is the ability for bot builders to use what it calls “stories.
Stories are essentially user stories, but they also serve as the real training data for the bot. The creator builds out an entire possible interaction or series of interactions, with phrase and response alternatives. Within these stories, you’re able to connect outside APIs to bring data into the chatbot. These features are the right mix of user friendliness to allow anyone to build a bot, while also allowing for the maximum amount of customization.
Like Chatfuel, Botsify permits template linking similar to the CNN use case. These links allow information to easily be tied to various communications between bot and user.
The Converse and Learning tools in Botisfy bring the AI capabilities of this system to a new level. In this window, you’re able to “teach” your bot based on real conversations within the application that it wasn’t able to answer.

The templates section of the Botsify application will make marketers swoon. These templates feature various ways to maximize interaction with chatbot users.

With templates, you can allow various messages to be tied directly into product options that link to purchase opportunities.

Dialogflow, became part of Google Cloud Platform in 2017, is another third-party tool that permits chatbot creation. Dialogflow is able to build conversational interfaces with a number of applications and devices.
Below, you’ll find the way Dialogflow layers into the chatbot development process.

The system architecture has the following components: (reference link: https://cloud.google.com/solutions/building-and-deploying-chatbotdialogflow)
• Multichannel integration: Any conversational interface connects with multiple channels, which can be in both voice and text format.
• Conversation management: This component is the heart of interface and typically provides the following functionality:
• Speech-to-Text (STT) and Text-to-Speech (TTS): Conversation interfaces have the ability to interact with speech and text.
• Virtual agent: Agents are responsible for managing the flow of the conversation based on the intent or motivation extracted from user conversation. A good conversation interface has an agent system that can handle linear and nonlinear conversations.
• Fulfillment interface: No conversation interface system is complete without a robust fulfillment interface, which is required to connect virtual agents to external systems. This interface is required to connect with external systems to fetch dynamic information to continue or fulfill a conversation.
MobileMonkey is a multi-platform chatbot builder, as well as the only platform that allows businesses to make Facebook ad bots, SMS bots, and native webchat bots in one place.
Additionally, the platform is extremely intuitive and does not require any coding knowledge.
Building a chatbot for your business with MobileMonkey To build a bot for your business, do the following:
• Decide what the bot will do for your business
• Navigate to the MobileMonkey bot builder.
• Select “Chatbots” from the sidebar.
• Select “Dialogues” to start building your bot.
• Add your dialogue options.
• Add your Q+A triggers.
• Test your bot!
Now, the #1 chat app in the U.S. is Facebook Messenger, and automated Messenger marketing has all-star engagement, beating engagement of Facebook Newsfeed, ads, and email marketing by 10X and more.
So for this example, here’s how you can build a Facebook Messenger chatbot in just 15 minutes using MobileMonkey.

From the menu, select any Facebook pages you want to connect to your chatbot platform, then click “Connect Facebook Pages.”

That’s all that is required to connect your Facebook page to your chatbot builder.
Select the Facebook page where you want to build a chatbot
If you’re only working on one Facebook page, then things are kind of simple.
As it is, all you need to do in this step is to click on the Facebook page where you’re making a chatbot.

In this example, we’ll be making a chatbot for a fictional real estate company, Unicorn Realty.
Once you click on the correct page, you’ll enter MobileMonkey’s main interface, which features the main menu, and includes access to everything you see in the screenshot below.

There’s a lot you can do here, but we’re going to dive straight into the Bot Builder.
Open up the Bot Builder.
When you start making chatbots, you’ll be spending a lot of time in the chatbot builder.

There are two options when opening the bot builder — dialogues and Q&A.
Dialogues are the heart and soul of chatbots — asking questions, providing options, delivering content. Basically, anything that a chatbot does.
Q&A involves a method of teaching your chatbot what to do when faced with certain keywords.
For example, if a customer is interacting with your chatbot and mentions price or cost, you can program your chatbot to respond with pricing information.
To use the Q&A feature, you’ll have to create dialogues that are triggered based on certain keywords.
So, we’re going to work on dialogues (not Q&As for this example).
Open the Dialogue Bot Builder
When you open the Bot Builder for the first time, you’ll see a pre-built Welcome Dialogue.
At this point, you’ll want to do a bit more to customize things and make this chatbot your very own.
Let’s take a look at the dialogue builder to see what’s what.

Add a Quick Question Widget.
Widgets are the chatbot building blocks. To create a chatbot dialogue, you’ll have to add widgets.
MobileMonkey has more than fifteen widgets, such as:
• Text
• Attachments
• Forms
• Images
• Lists
• GIFs, and
• Emails

One of the most versatile widgets is the quick question widget.
Click the Quick Question button to add it.
Add your quick question with an attribute
Since we’re creating a Welcome Dialogue, the question is intended to draw the user into a conversation.
Type your question and add an attribute. Attributes are things that the bot builder will automatically add based on what it knows about the user.
This includes things like the user’s name, gender, time zone, etc.
It’s a good idea to personalize your chatbot by including something like the user’s first name.

Save the user’s answer by creating a new attribute
One thing you’ll almost always want to do is save the user’s answer(s) by creating a new attribute. MobileMonkey will automatically save a list of these answers.
Set up a new attribute by clicking the new attribute button and naming it.

Add an input type for the user’s answer
You have five choices:
1. Multiple choice – The user selects their answer from options that you create
2. Free form text – The user can type whatever they want to
3. Location – The user can send their location with a single tap
4. Email – The chatbot automatically populates the answer with the user’s email and they tap to send it.
5. Phone – The user can provide their phone number with a quick tap
For this example, we’re going to use multiple choice. Multiple choice can include just a single choice or as many as you want. To answer the quick question, users will tap or click the response.
Create multiple choice answers
Click “Add Answer” to start creating the answer to the multiple-choice question.
From here, you can do things like adding images to your answers. It just makes it look more interesting.
Click the small image icon to the left of the answer box, and you can select an image file from your computer.
Type in your answer, and create as many choices as you want to.

Now that we’ve created a couple of answers, it’s important to discuss where we’re going with this.
Each answer is going to lead to something else. That something else is another dialogue.
Essentially, what you’re doing is creating a branching menu, where one option opens another conversation or dialogue.
What to do from here:
We’ve practically created your first MobileMonkey bot at this point. However, there’s plenty of options to continue your engagement with the audience in the present, and in the future.
One thing you’ll definitely want to do is test your chatbot periodically and see how it’s performing.
Do this by clicking the “Test Dialogue” button in the upper right corner.

How to Create a Chatbot and Beyond:
Here’s what you need to know about creating chatbots.
This is just the beginning.
There are dozens of chatbot tools, a website chatbot widget, SMS, webchat, Facebook Messenger ads creator, Messenger automation tools, customer service tools, list building tools, and tens of thousands of integrations.
There’s a lot of potential and success stories to be made once you dive in.
If you want to discover more of the potential of chatbots, try out the MobileMonkey chatbot templates library (mobilemonkey.com/chatbots/ facebook-messenger-templates).

MobileMonkey has a collection of pre-made templates (100% free) that will take that fifteen minutes of chatbot creation time and shrink it down to five. For more information about chatbots visit chatbots.org!
We’ve covered the subject of creating your own chatbot in quite some detail in this chapter, and we offered you some examples of several tools to consider when developing a chatbot on your own. In the next chapter, we’ll move beyond chatbots a bit and get you on the path to putting Machine Learning to work for you in your marketing efforts.